

Crypto-as-a-Service
Set Up Child Enterprises
Overview
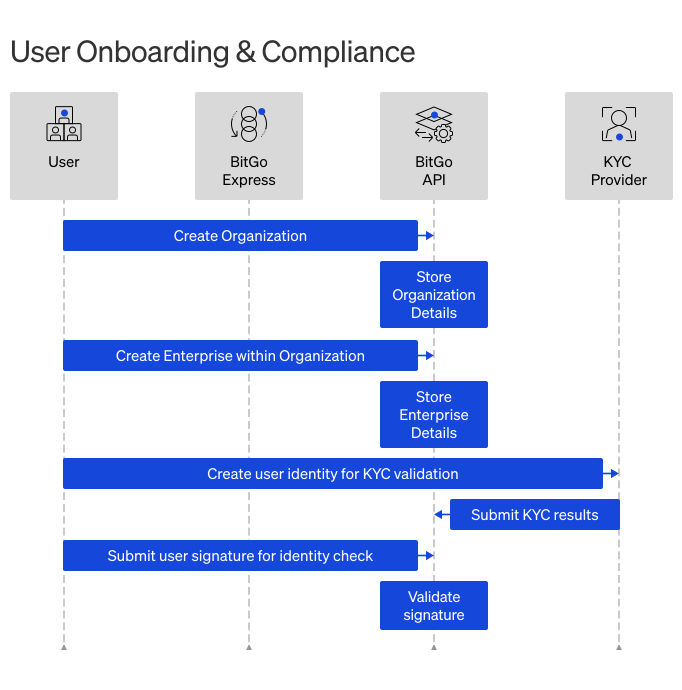
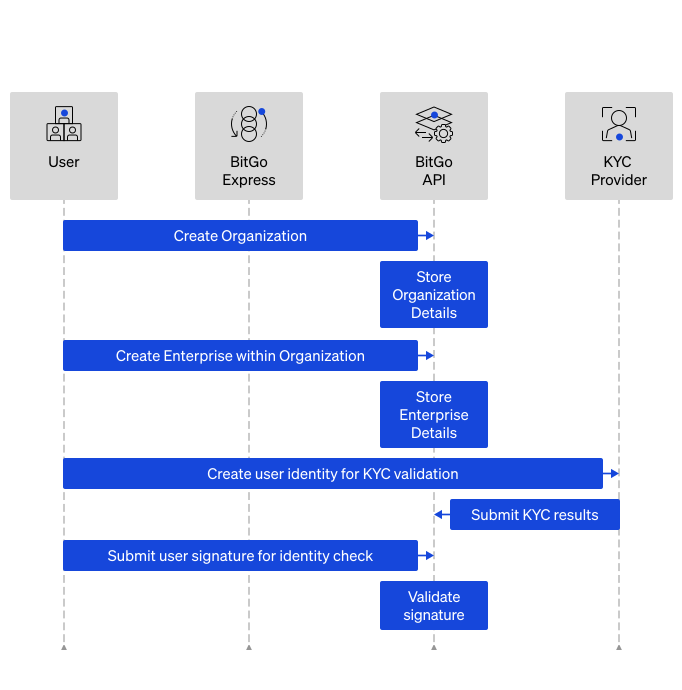
Within your parent organization, you must create a child enterprise and a BitGo user account for each of your users. To create the user accounts in BitGo, you must submit your users' personal information for Know Your Customer (KYC) verification. In addition to onboarding your users, you must also onboard the service user from your organization. However, the service user doesn't require KYC verification when you add them to the child enterprises, because they already completed KYC verification when you initially added them to your enterprise.
Note
You must add the same service user to every child enterprise you create.
Prerequisites
Cookbook
Need just the steps? Expand the cookbook below to get started:
Set Up Child EnterprisesOpen CookbookSet Up Child Enterprise
Note
You must be an organization admin to create a child enterprise
In this step, you create the child enterprise and the end user account. The organization service user automatically has access to every child enterprise you create, so you do not need to include them in additionalAdmins. The additionalAdmins field is optional — omit it when no extra admins are needed. If you do need to grant admin access to additional users, include their IDs in that field. Specify the accountType as either individual or entity depending on whether your end user is an individual person or a business. This determines whether you need to complete KYC or KYB verification for the end user. If you do not specify an account type, it defaults to your organization level configuration.
Note
In the test environment, child enterprises start with an approved KYC
state by default, so you can start testing immediately without completing the
KYC process. To simulate the full production onboarding flow — where a user
submits KYC and then receives an approval or rejection — set
fullSandboxKyc: true when creating the enterprise. This field has no effect
in production, where enterprises always start with a pending KYC state.
Endpoint: Create an Enterprise for an Organization
export ORGANIZATION_ID="<YOUR_ORGANIZATION_ID>"
export ACCESS_TOKEN="<ORG_ADMIN_ACCESS_TOKEN>"
export EMAIL="<YOUR_USER'S_EMAIL>"
export IDEMPOTENCY_KEY="<UNIQUE_IDENTIFIER_PER_REQUEST>"
export ORG_SERVICE_USER="<SERVICE_USER_ID>"

curl -X POST \
  "https://app.bitgo-test.com/api/v2/organization/$ORGANIZATION_ID/enterprise" \
  -H "Content-Type: application/json" \
  -H "Authorization: Bearer $ACCESS_TOKEN" \
  -d '{
    "email": "'"$EMAIL"'",
    "idempotencyKey": "'"$IDEMPOTENCY_KEY"'",
    "accountType": "individual", # use "entity" for business type end users
    "isCaaS": "'"true"'", # optional field to indicate this is a CaaS child enterprise - by default, it is true
    "fullSandboxKyc": "'"true"'" # optional (test environment only) — creates the enterprise with pending KYC state to simulate the full production onboarding flow
}'
import superagent from 'superagent';
import { v4 as uuidv4 } from 'uuid';
const ACCESS_TOKEN = '<ORG_ADMIN_ACCESS_TOKEN>';
const organizationId = '<YOUR_ORGANIZATION_ID>';

const apiUrl = `https://app.bitgo-test.com/api/v2/organization/${organizationId}/enterprise/`

const params = {
 email: 'johnsmith@bitgo.com',
 idempotencyKey: uuidv4(),
 accountType: 'individual', // use 'entity' for business type end users
 isCaaS: 'true', // optional field to indicate this is a CaaS child enterprise - by default, it is true
 fullSandboxKyc: true // optional (test environment only) — creates the enterprise with pending KYC state to simulate the full production onboarding flow
};

response = await superagent
 .post(apiUrl)
 .set('Authorization', `Bearer ${ACCESS_TOKEN}`)
 .set('Accept', 'application/json')
 .send(params);
Step Result
All of the following occurs:
- Create a new child enterprise within your parent organization with the specified account type.
- Create a new user for the child enterprise (this is your end user).
- Assign the service user to the child enterprise.
- Assign organization admins to the child enterprise (only when
additionalAdminsis provided).
{
  "enterpriseId": "59cd72485007a239fb00282ed480da1f", // newly created child enterprise for end user
  "userId": "59cd72485007a239fb00282ed480da1f" // primary contact for the end user of the child enterprise
}
Next Steps
Note
From this point on, service user should be used for all operations on child enterprises
Complete KYC Verification for individual users or Complete KYB Verification for business users.