# Complete Know Your Customer (KYC) Verification
Source: https://developers.bitgo.com/docs/crypto-as-a-service-know-your-customer
## Overview
The Know Your Customer (KYC) API enables you to programmatically verify the information of users onboarding to your platform and ensure regulatory compliance. Your users must complete KYC verification before they can use BitGo products on your platform.
## Supported Regions
BitGo supports KYC verification for end users under two trust entities. The `transactionType` you use when submitting KYC determines which trust entity and regulatory framework applies to your end user.
| Region | Trust Entity | Transaction Type |
| ------ | ----------- | --------------- |
| United States | BitGo Bank & Trust | `institutionalIndividual` |
| European Union | BitGo Europe GmbH | `euIndividual` |
> 📘 **Note**
>
> BitGo Europe GmbH is the sole EU legal entity holding all EU licenses and services all EEA (European Economic Area) countries.
## Prerequisites
* [Get Started](/docs/get-started-intro)
* [Set Up Organization](/docs/crypto-as-a-service-organization)
* [Set Up Child Enterprise](/docs/crypto-as-a-service-child-enterprises)
* [Setup Organization Webhooks](/docs/crypto-as-a-service-webhooks) (optional)
* You can set up webhooks to monitor the KYC process in real-time. Create an `identityStatus` type webhook to receive events whenever the identity status changes.
* [KYC Verification Simulation Flows - Test environment](#simulating-kyc-flows)
* You can simulate KYC verification end-to-end flows in the test environment by following the guide using specific debugging parameters.
## Cookbook
Need just the steps? Expand the cookbook below to get started:
## Steps
Select your region:
## KYC Lifecycle
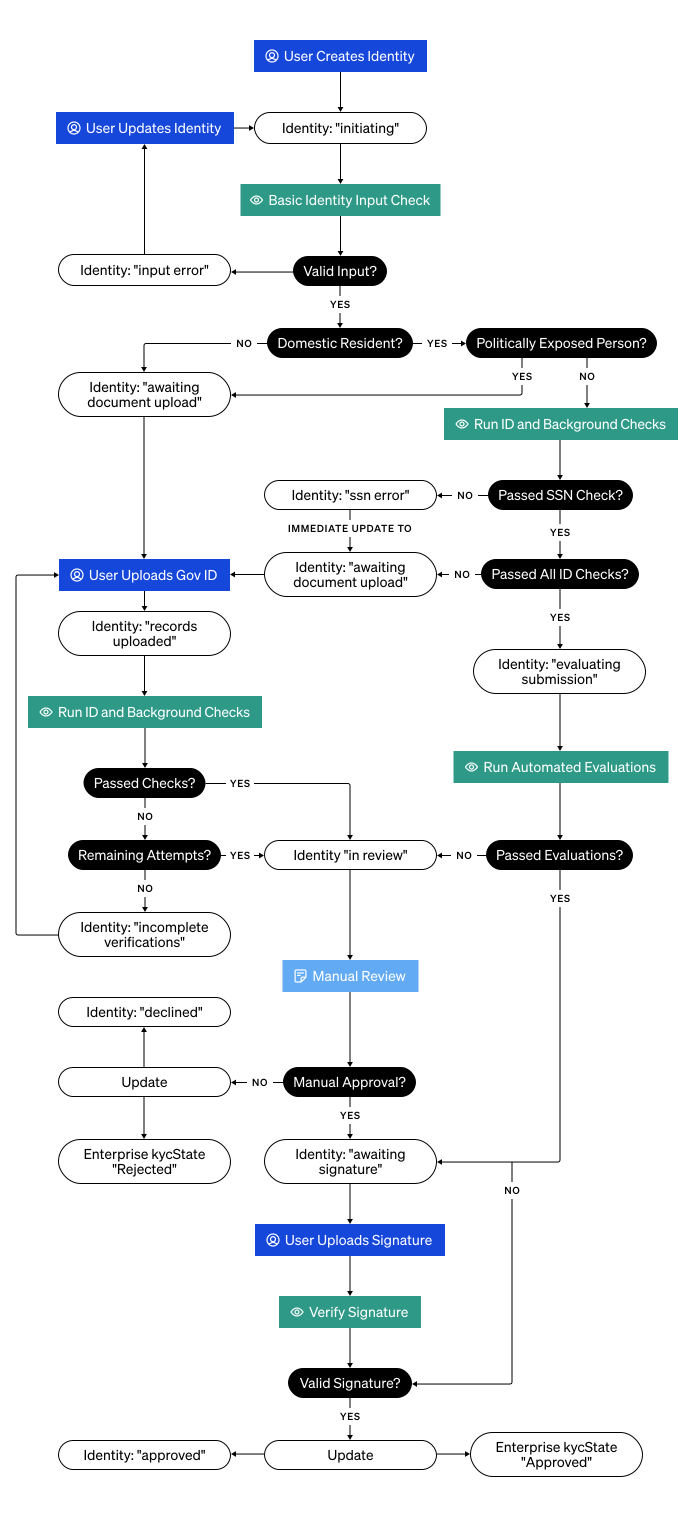
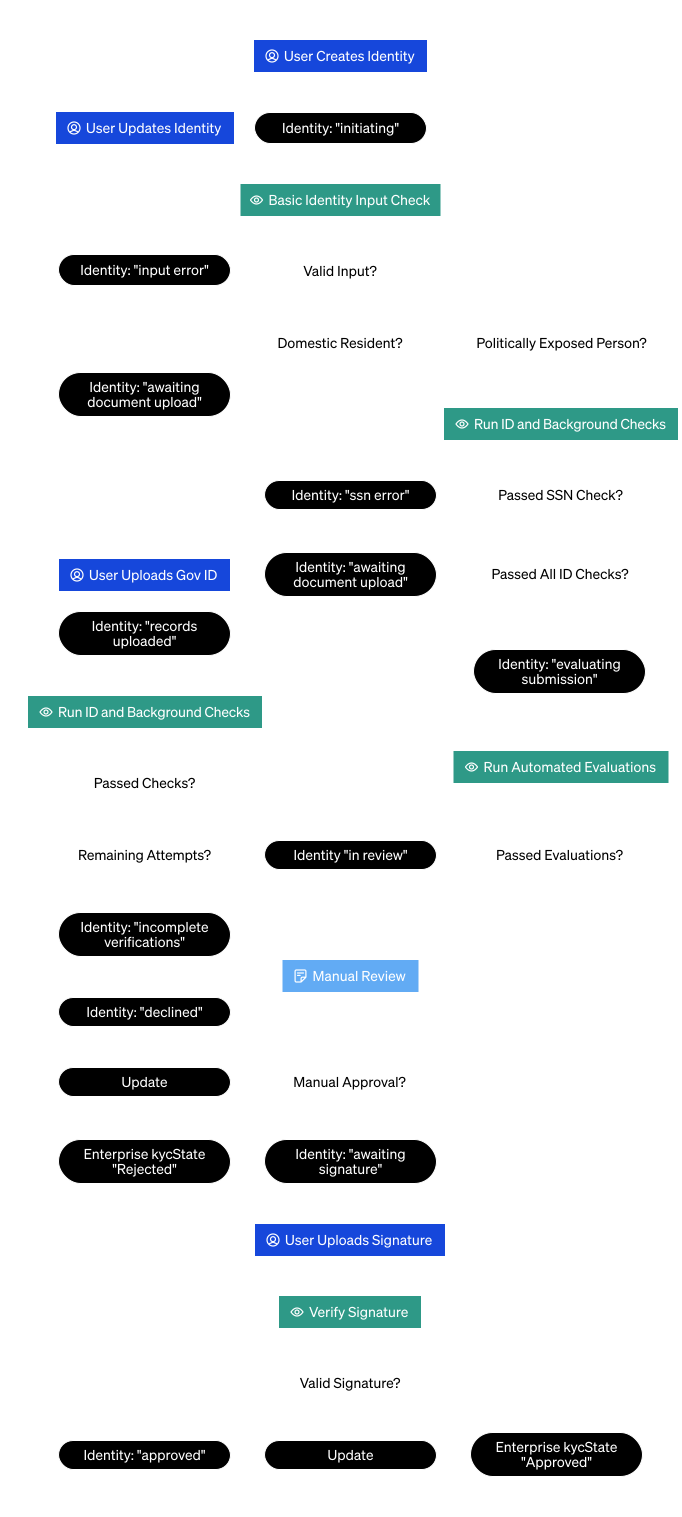
The diagram below provides a high-level overview of the US KYC lifecycle, illustrating the various states an identity can progress through from initial submission to final decision.
 ## 1. Submit KYC
Submit basic KYC information for your user. If necessary, uploading supporting documents occurs in the next step.
>Endpoint: [Create KYC Identity](/reference/entityvalidationidentitycreate)
```shell cURL
export ACCESS_TOKEN=""
export ORGANIZATION_ID=""
curl -X POST \
https://app.bitgo-test.com/api/evs/v1/identity \
-H "Content-Type: application/json" \
-H "Authorization: Bearer $ACCESS_TOKEN" \
-d '{
"enterpriseId": "59cd72485007a239fb00282ed480da1f", # newly created child enterprise for end user
"userId": "67d28e3dea178ede86f2962e959865a0", # primary contact for the end user of the child enterprise
"organizationId": "'"$ORGANIZATION_ID"'",
"nameFirst": "John",
"nameLast": "Doe",
"nameMiddle": "F",
"debugStatus": "passed",
"debugFailureReason": "",
"phoneNumber": "+442083661173",
"birthdate": "2025-03-13T00:00:00Z",
"occupation": "Other - Default",
"countryOfCitizenship": "USA",
"countryOfResidence": "USA",
"govIdCountryOfIssuance": "USA",
"identificationNumber": "494-14-2205",
"politicallyExposedPerson": false,
"addressStreet1": "Street 1",
"addressStreet2": "Unit 100",
"addressCity": "San Jose",
"addressSubdivision": "CA",
"country": "USA",
"transactionType": "institutionalIndividual",
"addressPostalCode": "33604"
}'
```
```js JavaScript
import superagent from 'superagent';
const ACCESS_TOKEN = '';
const organizationId = '';
const apiUrl = 'https://app.bitgo-test.com/api/evs/v1/identity/';
const params = {
birthdate: new Date().toISOString(),
country: 'USA',
countryOfIncorporation: 'USA',
countryOfCitizenship: 'USA',
countryOfResidence: 'USA',
govIdCountryOfIssuance: 'USA',
identificationNumber: '494-14-2205',
addressStreet1: 'Street 1',
addressCity: 'San Jose',
addressSubdivision: 'CA',
addressPostalCode: '33604',
dateOfIncorporation: '2025-03-13T00:00:00Z',
debugFailureReason: '',
debugStatus: 'passed',
enterpriseId: '59cd72485007a239fb00282ed480da1f', // newly created child enterprise for end user
userId: '67d28e3dea178ede86f2962e959865a0', // primary contact for the end user of the child enterprise
nameFirst: 'John',
nameMiddle: 'F',
nameLast: 'Doe',
phoneNumber: '+442083661173',
occupation: 'Other - Default',
politicallyExposedPerson: false,
organizationId,
transactionType: 'institutionalIndividual',
};
response = await superagent
.post(apiUrl)
.set('Authorization', `Bearer ${ACCESS_TOKEN}`)
.set('Accept', 'application/json')
.send(params);
```
#### Step Result
You create an identity for KYC purposes and BitGo returns the `id` and `status` of the created identity. The status is `initiating` which confirms that BitGo has received the end user's KYC information and is reviewing it.
```json JSON
{
"id": "993ec85b-ad23-4259-bde5-703a071a0783",
"status": "initiating"
}
```
BitGo requires valid tax identification numbers for US individuals (citizens and residents). Populate the `identificationNumber` field according to these requirements:
| Citizenship | Requirement |
| ----------- | ---------- |
| US citizens | Must provide a valid Social Security Number (SSN) |
| US residents (non-citizens) | Must provide a valid SSN or Individual Taxpayer Identification Number (ITIN) |
| Other non-US individuals (under BitGo Bank & Trust) | Can optionally submit SSN or ITIN if held (e.g. dual nationals, former US residents, etc.) |
## 2. Check KYC Status
Check the KYC status of your end user to determine next steps.
>Endpoint: [Get KYC Identity](/reference/entityvalidationidentityget)
```shell cURL
export ACCESS_TOKEN=""
export ORGANIZATION_ID=""
export ENTERPRISE_ID=""
export IDENTITY_ID=""
curl -X GET \
"https://app.bitgo-test.com/api/evs/v1/identity?organizationId=$ORGANIZATION_ID&enterpriseId=$ENTERPRISE_ID&identityId=$IDENTITY_ID" \
-H "Content-Type: application/json" \
-H "Authorization: Bearer $ACCESS_TOKEN"
```
```js JavaScript
import superagent from 'superagent';
const ACCESS_TOKEN = '';
const organizationId = '';
const enterpriseId = '';
const identityId = '';
const apiUrl = `https://app.bitgo-test.com/api/evs/v1/identity?organizationId=${organizationId}&enterpriseId=${enterpriseId}&identityId=${identityId}`;
const response = await superagent
.get(apiUrl)
.set('Authorization', `Bearer ${ACCESS_TOKEN}`);
```
> 📘 **Note**
>
> Use both the organization and enterprise IDs to successfully fetch your end user KYC identity.
#### Step Result
BitGo returns one of the following KYC statuses:
* `initiating` - BitGo confirms receipt of the end user's KYC information.
* `evaluating submission` - BitGo runs automated checks on the submitted KYC information.
* `input error` - The name or birthdate fields contain formatting issues. You must update the identity with properly formatted input fields.
* `taxid error` - The tax ID submitted is invalid. You must update the identity with a valid tax ID.
* `awaiting document upload` - BitGo requires supporting identity verification documents to continue with the review process.
* `in review` - BitGo manually reviews the KYC information.
* `awaiting signature` - BitGo completes review of the KYC information and now requires you to confirm verification with a signature.
* `incomplete verifications` - BitGo can't complete verification using the provided documents. You must re-upload identity verification documents for the end user. BitGo recommends uploading a different kind of identity verification document.
* `approved` - BitGo approves your end user's KYC verification and marks it as complete.
* `declined` - BitGo declines your end user's KYC verification.
```json JSON
{
"identities": [
{
"id": "5436ff2e-1129-49f1-8334-1510955ffe00",
"status": "awaiting document upload",
"organizationId": "68928b9066417fe09212fe9965c88552",
"enterpriseId": "690a234346b3252214cdaf72070c549e",
"userId": "690a234046b3252214cdadfe8600df80",
"createdAt": "2025-11-04T16:05:15.359Z",
"updatedAt": "2025-11-04T16:05:17.975Z",
"signaturesSubmitted": [],
"signaturesRequired": []
}
]
}
```
## 3. Submit Documents
If the end user's KYC status is `awaiting document upload`, you must submit their identity verification documents. Document submission requirements vary by citizenship:
| Citizenship | Documentation Required? |
| ----------- | ---------------------- |
| US citizens | Not required unless BitGo explicitly requests it |
| Non-US citizens (under BitGo Bank & Trust) | Identity verification documents required |
BitGo recommends submitting all necessary documents for an end user in a single API call. Document files can't exceed **15MB** and must be at least **200x200px**.
> 📘 **Note**
>
> BitGo limits the number of times you can submit documents for each end user. Ensure document quality before submission to avoid exhausting retry attempts.
### 3.1 Add Documents
>Endpoint: [Add KYC Documents](/reference/entityvalidationidentitydocumentcreate)
```shell cURL
export IDENTITY_ID=""
export ACCESS_TOKEN=""
export ID_CLASS=""
curl -X POST \
"https://app.bitgo-test.com/api/evs/v1/identity/$IDENTITY_ID/document" \
-H "Authorization: Bearer $ACCESS_TOKEN" \
-F "selectedIdClass=$ID_CLASS" \
-F "frontPhoto=@" \
-F "backPhoto=@" \
-F "proofOfResidency=@"
```
```js JavaScript
import superagent from 'superagent';
import FormData from 'form-data';
import fs from 'fs';
const ACCESS_TOKEN = '';
const identityId = '';
const idClass = '';
const apiUrl = `https://app.bitgo-test.com/api/evs/v1/identity/${identityId}/document`;
const formData = new FormData();
formData.append('selectedIdClass', idClass);
formData.append('frontPhoto', fs.createReadStream(''));
formData.append('backPhoto', fs.createReadStream(''));
formData.append('proofOfResidency', fs.createReadStream(''));
const response = await superagent
.post(apiUrl)
.set('Authorization', `Bearer ${ACCESS_TOKEN}`)
.send(formData);
```
#### Step Result
BitGo returns the following:
* The document ID - A unique ID for the document submission. Store this ID for use if you need to update the document submission.
* The document status - the initial status is `pending` which confirms that BitGo has received the document. Other possible statuses include:
- `processing` - BitGo is validating the document
- `approved` - BitGo successfully verified the document
- `rejected` - The document failed verification
* The list of files that you uploaded for the end user including details such as file upload status, document type, and size.
```json JSON
{
"id": "02f3186c-8589-4lfa-a800-1e5cc169c726",
"status": "pending",
"selectedIdClass": "pp",
"fileUploads": [
{
"fileName": "passport-front.jpeg",
"fileSize": 11275,
"uploadStatus": "pending",
"documentType": "frontPhoto"
}
]
}
```
BitGo processes the documents with the following workflow:
1. **Initial receipt** - The end user's KYC status updates to `records uploaded`.
2. **Automated validation** - BitGo runs automated checks on the submitted documents.
3. Then, one of the following occurs:
- **Validation passed or failed with no retry attempts remaining:** - The end user's status updates to `in review` for manual review by BitGo.
- **Validation failed (with retry attempts remaining):** The end user's status updates to `incomplete verifications`, and you must re-upload improved documentation.
### 3.2 Get Documents
After submitting documents, you can retrieve the document details to check upload status and verify file information.
>Endpoint: [Get KYC Document](/reference/entityvalidationidentitydocumentget)
```shell cURL
export ACCESS_TOKEN=""
export IDENTITY_ID=""
export DOCUMENT_ID=""
curl -X GET \
"https://app.bitgo-test.com/api/evs/v1/identity/document?identityId=$IDENTITY_ID&documentId=$DOCUMENT_ID" \
-H "Content-Type: application/json" \
-H "Authorization: Bearer $ACCESS_TOKEN"
```
```js JavaScript
import superagent from 'superagent';
const ACCESS_TOKEN = '';
const identityId = '';
const documentId = '';
const apiUrl = `https://app.bitgo-test.com/api/evs/v1/identity/document?identityId=${identityId}&documentId=${documentId}`;
const response = await superagent
.get(apiUrl)
.set('Content-Type', 'application/json')
.set('Authorization', `Bearer ${ACCESS_TOKEN}`);
```
> 📘 **Note**
>
> You can query by either `identityId` or `documentId`, or both. At least one parameter is required.
#### Step Result
```json JSON
{
"documents": [
{
"id": "02f3186c-8589-4lfa-a800-1e5cc169c726",
"status": "processing",
"selectedIdClass": "pp",
"fileUploads": [
{
"fileName": "passport-front.jpeg",
"fileSize": 11275,
"uploadStatus": "uploaded",
"documentType": "frontPhoto"
},
{
"fileName": "passport-back.jpeg",
"fileSize": 10842,
"uploadStatus": "uploaded",
"documentType": "backPhoto"
}
]
}
]
}
```
### 3.3 Update Documents
You can only update documents when the KYC status is `incomplete verifications`. [Verify the status](#2-check-kyc-status) before proceeding.
>Endpoint: [Update KYC Document](/reference/entityvalidationidentitydocumentupdate)
```shell cURL
export IDENTITY_ID=""
export ACCESS_TOKEN=""
export ID_CLASS=""
export DOCUMENT_ID="" # The ID of the document initially created
curl -X PUT \
"https://app.bitgo-test.com/api/evs/v1/identity/$IDENTITY_ID/document/$DOCUMENT_ID" \
-H "Authorization: Bearer $ACCESS_TOKEN" \
-F "selectedIdClass=$ID_CLASS" \
-F "frontPhoto=@" \
-F "backPhoto=@" \
-F "proofOfResidency=@"
```
```js JavaScript
import superagent from 'superagent';
import FormData from 'form-data';
import fs from 'fs';
const ACCESS_TOKEN = '';
const identityId = '';
const idClass = '';
const documentId = ''; // The ID of the document initially created
const apiUrl = `https://app.bitgo-test.com/api/evs/v1/identity/${identityId}/document/${documentId}`;
const formData = new FormData();
formData.append('selectedIdClass', idClass);
formData.append('frontPhoto', fs.createReadStream(''));
formData.append('backPhoto', fs.createReadStream(''));
formData.append('proofOfResidency', fs.createReadStream(''));
const response = await superagent
.put(apiUrl)
.set('Authorization', `Bearer ${ACCESS_TOKEN}`)
.send(formData);
```
#### Step Result
```json JSON
{
"id": "02f3186c-8589-4lfa-a800-1e5cc169c726",
"status": "pending",
"selectedIdClass": "pp",
"fileUploads": [
{
"fileName": "passport-front.jpeg",
"fileSize": 11275,
"uploadStatus": "pending",
"documentType": "frontPhoto"
}
]
}
```
## 4. Sign Completed KYC
Once BitGo approves the KYC verification, your end user must sign to confirm. You can repeat step 2, Check KYC Status, to verify when the end user is `awaiting signature`.
>Endpoint: [Submit KYC Signatures](/reference/entityvalidationidentitysignatures)
```shell cURL
export IDENTITY_ID=""
export ACCESS_TOKEN=""
curl -X POST \
"https://app.bitgo-test.com/api/evs/v1/identity/$IDENTITY_ID/signatures" \
-H "Content-Type: application/json" \
-H "Authorization: Bearer $ACCESS_TOKEN" \
-d '[
{
"contractSignerNameFull": "John Smith",
"contractSignedDate": "2025-03-13 13:14:09.767480+00:00",
"contractSignedIPAddress": "123.123.123.123",
"contractVersion": "1.0",
"contractType": "csa",
"userAgreesToTerms": true
},
{
"contractSignerNameFull": "John Smith",
"contractSignedDate": "2025-03-13 13:14:09.767480+00:00",
"contractSignedIPAddress": "123.123.123.123",
"contractVersion": "1.0",
"contractType": "mpa",
"userAgreesToTerms": true
},
{
"contractSignerNameFull": "Jerry Smith",
"contractSignedDate": "2025-03-13 13:14:09.767480+00:00",
"contractSignedIPAddress": "123.123.123.123",
"contractVersion": "1.0",
"contractType": "mic",
"userAgreesToTerms": true
}
]'
```
```js JavaScript
import superagent from 'superagent';
const ACCESS_TOKEN = '';
const IDENTITY_ID = '';
const apiUrl = `https://app.bitgo-test.com/api/evs/v1/identity/${IDENTITY_ID}/signatures`;
const params = [
{
"contractSignerNameFull": "John Smith",
"contractSignedDate": "2025-03-13 13:14:09.767480+00:00",
"contractSignedIPAddress": "123.123.123.123",
"contractVersion": "1.0",
"contractType": "csa",
"userAgreesToTerms": true
},
{
"contractSignerNameFull": "Jay Smith",
"contractSignedDate": "2025-03-13 13:14:09.767480+00:00",
"contractSignedIPAddress": "123.123.123.123",
"contractVersion": "1.0",
"contractType": "mpa",
"userAgreesToTerms": true
},
{
"contractSignerNameFull": "Jerry Smith",
"contractSignedDate": "2025-03-13 13:14:09.767480+00:00",
"contractSignedIPAddress": "123.123.123.123",
"contractVersion": "1.0",
"contractType": "mic",
"userAgreesToTerms": true
}
];
response = await superagent
.post(apiUrl)
.set('Authorization', `Bearer ${ACCESS_TOKEN}`)
.set('Accept', 'application/json')
.send(params);
```
#### Step Result
```json JSON
{
"id": "cf5d766d-bef1-4874-8b02-54ded0e8333e",
"status": "signature submitted",
"organizationId": "6573806ef79cafdd1aff42fbffc2ab20",
"enterpriseId": "67d28e40ea178ede86f296ac90032286",
"userId": "67d28e3dea178ede86f2962e959865a0",
"updatedAt": "2025-03-13T07:59:52.564Z",
"createdAt": "2025-03-13T07:54:18.842Z",
"errorDescription": "",
"signaturesSubmitted": ["", ""],
"signaturesRequired": []
}
```
## Simulating KYC Flows
You can simulate different KYC verification flows to test your integration without manual review from BitGo.
The `debugStatus` field enables you to control the KYC verification flow during testing. It accepts `failed` and `passed` as valid values and defaults to `passed`.
You can also pass `debugFailureReason` to get more specific errors on the identity `errorDescription`, this does not impact the KYC flow and is supplementary to `debugStatus`. Some possible values with specific error message mappings are: `expired`, `cannot_verify_id`, `portrait_not_found`, `portrait_not_clear`, `face_mismatch`, etc.
You can set both `debugStatus` and `debugFailureReason` when creating an identity and you can only update these fields when the identity status is `awaiting document upload` or `incomplete verifications` using the [Update KYC Identity](/reference/entityvalidationidentityupdate) endpoint.
> 📘 **Note**
>
> The following test paths are only available in the BitGo test environment.
This path simulates the fastest approval scenario where document upload is not required.
#### Steps
1. Create an identity for a non-PEP (politically exposed person) US citizen without the `debugStatus` parameter.
- **Recommendation**: Avoid using New York (NY) as the state, as NY-based identities may sometimes require additional documentation.
2. The identity status automatically progresses to `awaiting signature`, bypassing document upload.
3. Submit the required signatures.
#### Expected Outcome
The identity status updates to `approved` without requiring document upload.
This path simulates approval after document upload and review.
#### Steps
1. Create an identity for a non-US citizen/PEP or set `debugStatus` to `failed`.
2. The identity status updates to `awaiting document upload`.
3. **Important**: If you initially set `debugStatus` to `failed`, update it to `passed`.
4. Submit the identity verification documents.
5. The identity status progresses from `in review` to `awaiting signature`.
6. Submit the required signatures.
#### Expected Outcome
The identity status updates to `approved` after successful document verification and signature submission.
This path simulates the resubmission workflow when initial document verification fails.
#### Steps
1. Create an identity for a non-US citizen/PEP or set `debugStatus` to `failed`.
2. The identity status updates to `awaiting document upload`.
3. **Important**: Ensure `debugStatus` is set to `failed`. If not, update the identity.
4. Submit the identity verification documents.
5. The identity status updates to `incomplete verifications`.
6. Update `debugStatus` to `passed` on the identity.
7. Resubmit improved documents.
8. The identity status progresses from `in review` to `awaiting signature`.
9. Submit the required signatures.
#### Expected Outcome
The identity status updates to `approved` after successful document resubmission and signature submission.
> 📘 **Note**
>
> BitGo enables a limited number of resubmission attempts when the status is `incomplete verifications`. Use this path to test your error handling and resubmission logic.
This path simulates a declined KYC after exhausting all resubmission attempts.
#### Steps
1. Create an identity for a non-US citizen/PEP or set `debugStatus` to `failed`.
2. The identity status updates to `awaiting document upload`.
3. **Important**: Ensure `debugStatus` is set to `failed` and **remains set to `failed`** throughout all submission attempts.
4. Submit the identity verification documents.
5. The identity status updates to `incomplete verifications`.
6. Repeat document submission until you exhaust all attempts.
7. After the final failed attempt, the identity status automatically progresses from `in review` to `declined`.
#### Expected Outcome
The identity status updates to `declined` after exhausting all resubmission attempts with failed verifications.
> 📘 **Note**
>
> Use this path to test your integration's handling of declined KYC scenarios and ensure your application properly notifies end users when BitGo rejects their KYC.
## Overview
Use this flow when your platform holds a license issued by an European Union (EU) or European Economic Area (EEA) financial authority, such as a MiCAR Crypto-Asset Service Provider (CASP) license or an e-money institution license. Your platform carries independent compliance obligations alongside BitGo's.
Ensure your onboarding flow requires each EEA customer to execute the Custodial Services Agreement and Electronic Trading Agreement (Schedules B-1 and B-2) before they access BitGo Services.
## KYC Lifecycle
EU KYC is simpler than the US KYC, because it doesn't require uploading documents. BitGo handles KYC for EU individuals through an identity verification (IDV) flow that your end users complete during onboarding.
EU identity states:
1. `initiating` — BitGo confirms receipt of the end user's KYC information.
2. `evaluating submission` — Automated checks run on the submitted information.
3. `input error` — Name or birthdate fields contain formatting issues. You must update the identity before it can proceed.
4. `in review` — BitGo manually reviews the KYC information.
5. `awaiting signature` — BitGo completes review and requires the end user to confirm verification with a signature.
6. `signature submitted` — The end user has signed; final processing is in progress.
7. `approved` or `declined` — Final outcome of the KYC review.
Unlike the US flow, EU identities don't enter `awaiting document upload` or `incomplete verifications` states.
## 1. Submit KYC
Submit KYC information for your end user.
>Endpoint: [Create KYC Identity](/reference/entityvalidationidentitycreate)
```shell cURL
export ACCESS_TOKEN=""
export ORGANIZATION_ID=""
curl -X POST \
https://app.bitgo-test.com/api/evs/v1/identity \
-H "Content-Type: application/json" \
-H "Authorization: Bearer $ACCESS_TOKEN" \
-d '{
"enterpriseId": "59cd72485007a239fb00282ed480da1f",
"userId": "67d28e3dea178ede86f2962e959865a0",
"organizationId": "'"$ORGANIZATION_ID"'",
"externalUserId": "external-user-hans-mueller-001",
"transactionType": "euIndividual",
"nameFirst": "Hans",
"nameLast": "Müller",
"dateOfBirth": {
"year": "1985",
"month": "06",
"day": "15"
},
"cityOfBirth": "Frankfurt am Main",
"countryOfBirth": "DEU",
"countryOfCitizenship": "DEU",
"countryOfResidence": "DEU",
"taxId": "12345678901",
"countryOfTaxResidence": "DEU",
"industry": "Software & IT Services",
"employmentStatus": "Employee",
"sourceOfFunds": "Income from Employment",
"email": "hans.mueller@example.com",
"phoneNumber": "+4969123456789",
"politicallyExposedPerson": false,
"idvPerformed": true,
"initialKycCompletionDate": {
"year": "2024",
"month": "01",
"day": "10"
},
"lastKycCompletionDate": {
"year": "2025",
"month": "03",
"day": "13"
},
"govIdType": "pp",
"govIdNumber": "C01X00T47",
"govIdExpiry": {
"year": "2030",
"month": "12",
"day": "31"
},
"govIdCountryOfIssuance": "DEU",
"addressStreet1": "Mainzer Landstraße 50",
"addressCity": "Frankfurt am Main",
"addressPostalCode": "60325",
"debugStatus": "passed",
"debugFailureReason": ""
}'
```
* Use `"transactionType": "euIndividual"` to route the identity to BitGo Europe GmbH.
* Use ISO 3166-1 country codes for `countryOfCitizenship`, `countryOfResidence`, `countryOfBirth`, `countryOfTaxResidence`, and `govIdCountryOfIssuance`. The API accepts both alpha-2 (`"DE"`) and alpha-3 (`"DEU"`) formats.
* Provide `taxId` (EU tax identification number) instead of `identificationNumber` (US SSN/ITIN), which does not apply to EU individuals.
* Date fields (`dateOfBirth`, `govIdExpiry`, `initialKycCompletionDate`, `lastKycCompletionDate`) accept a `{ "year", "month", "day" }` object, not the ISO timestamp strings used by the US schema. The `lastKycCompletionDate` value must fall within the last 2 years.
* `industry`, `employmentStatus`, and `sourceOfFunds` are required enums. Accepted `sourceOfFunds` values: `"Income from Employment"`, `"Pension"`, `"Income from Renting and Leasing"`, `"Income from Self-Employment"`, `"Inheritance / Gift"`, `"Crypto"`, `"Other Financial Support"`.
* `govIdType` accepts: `pp` (passport), `ppc` (passport card), `rp` (residence permit), `pr` (permanent residence), `id` (national ID). For `EURegulated` enterprises, all four government ID fields are required: `govIdType`, `govIdNumber`, `govIdExpiry`, and `govIdCountryOfIssuance`.
#### Step Result
You create an identity for KYC purposes and BitGo returns the `id` and `status` of the created identity. The status is `initiating` which confirms that BitGo has received the end user's KYC information and is reviewing it.
```json JSON
{
"id": "993ec85b-ad23-4259-bde5-703a071a0783",
"status": "initiating"
}
```
## 2. Check KYC Status
Check the KYC status of your end user to determine next steps.
>Endpoint: [Get KYC Identity](/reference/entityvalidationidentityget)
```shell cURL
export ACCESS_TOKEN=""
export ORGANIZATION_ID=""
export ENTERPRISE_ID=""
export IDENTITY_ID=""
curl -X GET \
"https://app.bitgo-test.com/api/evs/v1/identity?organizationId=$ORGANIZATION_ID&enterpriseId=$ENTERPRISE_ID&identityId=$IDENTITY_ID" \
-H "Content-Type: application/json" \
-H "Authorization: Bearer $ACCESS_TOKEN"
```
```js JavaScript
import superagent from 'superagent';
const ACCESS_TOKEN = '';
const organizationId = '';
const enterpriseId = '';
const identityId = '';
const apiUrl = `https://app.bitgo-test.com/api/evs/v1/identity?organizationId=${organizationId}&enterpriseId=${enterpriseId}&identityId=${identityId}`;
const response = await superagent
.get(apiUrl)
.set('Authorization', `Bearer ${ACCESS_TOKEN}`);
```
> 📘 **Note**
>
> Use both the organization and enterprise IDs to successfully fetch your end user KYC identity.
#### Step Result
BitGo returns one of the following KYC statuses:
* `initiating` - BitGo confirms receipt of the end user's KYC information.
* `evaluating submission` - BitGo runs automated checks on the submitted KYC information.
* `input error` - The name or birthdate fields contain formatting issues. You must update the identity with properly formatted input fields.
* `in review` - BitGo manually reviews the KYC information.
* `awaiting signature` - BitGo completes review of the KYC information and now requires you to confirm verification with a signature.
* `approved` - BitGo approves your end user's KYC verification and marks it as complete.
* `declined` - BitGo declines your end user's KYC verification.
```json JSON
{
"identities": [
{
"id": "5436ff2e-1129-49f1-8334-1510955ffe00",
"status": "in review",
"organizationId": "68928b9066417fe09212fe9965c88552",
"enterpriseId": "690a234346b3252214cdaf72070c549e",
"userId": "690a234046b3252214cdadfe8600df80",
"createdAt": "2025-11-04T16:05:15.359Z",
"updatedAt": "2025-11-04T16:05:17.975Z",
"signaturesSubmitted": [],
"signaturesRequired": []
}
]
}
```
## 3. Sign Completed KYC
Once BitGo approves the KYC verification, your end user must sign to confirm. You can repeat step 2, Check KYC Status, to verify when the end user is `awaiting signature`.
Your organization's agreements with BitGo determine the required `contractType` values — contact BitGo if you are unsure which contract types apply to your integration.
Each signature object serves as a digital record of the end user's agreement. The `contractSignerNameFull`, `contractSignedDate`, and `contractSignedIPAddress` fields together capture the full name, timestamp, and IP address that constitute the electronic signature.
>Endpoint: [Submit KYC Signatures](/reference/entityvalidationidentitysignatures)
```shell cURL
export IDENTITY_ID=""
export ACCESS_TOKEN=""
curl -X POST \
"https://app.bitgo-test.com/api/evs/v1/identity/$IDENTITY_ID/signatures" \
-H "Content-Type: application/json" \
-H "Authorization: Bearer $ACCESS_TOKEN" \
-d '[
{
"contractSignerNameFull": "Hans Müller",
"contractSignedDate": "2025-03-13 13:14:09.767480+00:00",
"contractSignedIPAddress": "123.123.123.123",
"contractVersion": "1.0",
"contractType": "",
"userAgreesToTerms": true
}
]'
```
#### Step Result
```json JSON
{
"id": "cf5d766d-bef1-4874-8b02-54ded0e8333e",
"status": "signature submitted",
"organizationId": "6573806ef79cafdd1aff42fbffc2ab20",
"enterpriseId": "67d28e40ea178ede86f296ac90032286",
"userId": "67d28e3dea178ede86f2962e959865a0",
"updatedAt": "2025-03-13T07:59:52.564Z",
"createdAt": "2025-03-13T07:54:18.842Z",
"errorDescription": "",
"signaturesSubmitted": ["", ""],
"signaturesRequired": []
}
```
## Overview
Use this flow when your platform does not hold a license issued by a European Union (EU)/European Economic Area (EEA) financial authority. Your platform has no independent licensing obligations, however all BitGo onboarding requirements still apply to your integration.
Ensure your onboarding flow requires each EEA customer to execute the Custodial Services Agreement and Electronic Trading Agreement (Schedules B-1 and B-2) before they access BitGo Services.
## KYC Lifecycle
The EU unregulated KYC lifecycle requires a dual-approval model. Your end users must pass both a standard identity check and an IDV step before BitGo clears them. The identity check and IDV run independently, so you don't need to wait for one to complete before starting the other.
## 1. Submit KYC
Submit basic KYC information for your user. If necessary, uploading supporting documents occurs in the next step.
>Endpoint: [Create KYC Identity](/reference/entityvalidationidentitycreate)
```shell cURL
export ACCESS_TOKEN=""
export ORGANIZATION_ID=""
curl -X POST \
https://app.bitgo-test.com/api/evs/v1/identity \
-H "Content-Type: application/json" \
-H "Authorization: Bearer $ACCESS_TOKEN" \
-d '{
"enterpriseId": "59cd72485007a239fb00282ed480da1f", # newly created child enterprise for end user
"userId": "67d28e3dea178ede86f2962e959865a0", # primary contact for the end user of the child enterprise
"organizationId": "'"$ORGANIZATION_ID"'",
"nameFirst": "John",
"nameLast": "Doe",
"nameMiddle": "F",
"debugStatus": "passed",
"debugFailureReason": "",
"phoneNumber": "+442083661173",
"birthdate": "2025-03-13T00:00:00Z",
"occupation": "Other - Default",
"countryOfCitizenship": "USA",
"countryOfResidence": "USA",
"govIdCountryOfIssuance": "USA",
"identificationNumber": "494-14-2205",
"politicallyExposedPerson": false,
"addressStreet1": "Street 1",
"addressStreet2": "Unit 100",
"addressCity": "San Jose",
"addressSubdivision": "CA",
"country": "USA",
"transactionType": "institutionalIndividual",
"addressPostalCode": "33604"
}'
```
```js JavaScript
import superagent from 'superagent';
const ACCESS_TOKEN = '';
const organizationId = '';
const apiUrl = 'https://app.bitgo-test.com/api/evs/v1/identity/';
const params = {
birthdate: new Date().toISOString(),
country: 'USA',
countryOfIncorporation: 'USA',
countryOfCitizenship: 'USA',
countryOfResidence: 'USA',
govIdCountryOfIssuance: 'USA',
identificationNumber: '494-14-2205',
addressStreet1: 'Street 1',
addressCity: 'San Jose',
addressSubdivision: 'CA',
addressPostalCode: '33604',
dateOfIncorporation: '2025-03-13T00:00:00Z',
debugFailureReason: '',
debugStatus: 'passed',
enterpriseId: '59cd72485007a239fb00282ed480da1f', // newly created child enterprise for end user
userId: '67d28e3dea178ede86f2962e959865a0', // primary contact for the end user of the child enterprise
nameFirst: 'John',
nameMiddle: 'F',
nameLast: 'Doe',
phoneNumber: '+442083661173',
occupation: 'Other - Default',
politicallyExposedPerson: false,
organizationId,
transactionType: 'institutionalIndividual',
};
response = await superagent
.post(apiUrl)
.set('Authorization', `Bearer ${ACCESS_TOKEN}`)
.set('Accept', 'application/json')
.send(params);
```
#### Step Result
You create an identity for KYC purposes and BitGo returns the `id` and `status` of the created identity. The status is `initiating` which confirms that BitGo has received the end user's KYC information and is reviewing it.
```json JSON
{
"id": "993ec85b-ad23-4259-bde5-703a071a0783",
"status": "initiating"
}
```
BitGo requires valid tax identification numbers for US individuals (citizens and residents). Populate the `identificationNumber` field according to these requirements:
| Citizenship | Requirement |
| ----------- | ---------- |
| US citizens | Must provide a valid Social Security Number (SSN) |
| US residents (non-citizens) | Must provide a valid SSN or Individual Taxpayer Identification Number (ITIN) |
| Other non-US individuals (under BitGo Bank & Trust) | Can optionally submit SSN or ITIN if held (e.g. dual nationals, former US residents, etc.) |
## 2. Check KYC Status
Check the KYC status of your end user to determine next steps.
>Endpoint: [Get KYC Identity](/reference/entityvalidationidentityget)
```shell cURL
export ACCESS_TOKEN=""
export ORGANIZATION_ID=""
export ENTERPRISE_ID=""
export IDENTITY_ID=""
curl -X GET \
"https://app.bitgo-test.com/api/evs/v1/identity?organizationId=$ORGANIZATION_ID&enterpriseId=$ENTERPRISE_ID&identityId=$IDENTITY_ID" \
-H "Content-Type: application/json" \
-H "Authorization: Bearer $ACCESS_TOKEN"
```
```js JavaScript
import superagent from 'superagent';
const ACCESS_TOKEN = '';
const organizationId = '';
const enterpriseId = '';
const identityId = '';
const apiUrl = `https://app.bitgo-test.com/api/evs/v1/identity?organizationId=${organizationId}&enterpriseId=${enterpriseId}&identityId=${identityId}`;
const response = await superagent
.get(apiUrl)
.set('Authorization', `Bearer ${ACCESS_TOKEN}`);
```
> 📘 **Note**
>
> Use both the organization and enterprise IDs to successfully fetch your end user KYC identity.
#### Step Result
BitGo returns one of the following KYC statuses:
* `initiating` - BitGo confirms receipt of the end user's KYC information.
* `evaluating submission` - BitGo runs automated checks on the submitted KYC information.
* `input error` - The name or birthdate fields contain formatting issues. You must update the identity with properly formatted input fields.
* `taxid error` - The tax ID submitted is invalid. You must update the identity with a valid tax ID.
* `awaiting document upload` - BitGo requires supporting identity verification documents to continue with the review process.
* `in review` - BitGo manually reviews the KYC information.
* `awaiting signature` - BitGo completes review of the KYC information and now requires you to confirm verification with a signature.
* `incomplete verifications` - BitGo can't complete verification using the provided documents. You must re-upload identity verification documents for the end user. BitGo recommends uploading a different kind of identity verification document.
* `approved` - BitGo approves your end user's KYC verification and marks it as complete.
* `declined` - BitGo declines your end user's KYC verification.
```json JSON
{
"identities": [
{
"id": "5436ff2e-1129-49f1-8334-1510955ffe00",
"status": "awaiting document upload",
"organizationId": "68928b9066417fe09212fe9965c88552",
"enterpriseId": "690a234346b3252214cdaf72070c549e",
"userId": "690a234046b3252214cdadfe8600df80",
"createdAt": "2025-11-04T16:05:15.359Z",
"updatedAt": "2025-11-04T16:05:17.975Z",
"signaturesSubmitted": [],
"signaturesRequired": []
}
]
}
```
## 3. Submit Documents
If the end user's KYC status is `awaiting document upload`, you must submit their identity verification documents. Document submission requirements vary by citizenship:
| Citizenship | Documentation Required? |
| ----------- | ---------------------- |
| US citizens | Not required unless BitGo explicitly requests it |
| Non-US citizens (under BitGo Bank & Trust) | Identity verification documents required |
BitGo recommends submitting all necessary documents for an end user in a single API call. Document files can't exceed **15MB** and must be at least **200x200px**.
> 📘 **Note**
>
> BitGo limits the number of times you can submit documents for each end user. Ensure document quality before submission to avoid exhausting retry attempts.
### 3.1 Add Documents
>Endpoint: [Add KYC Documents](/reference/entityvalidationidentitydocumentcreate)
```shell cURL
export IDENTITY_ID=""
export ACCESS_TOKEN=""
export ID_CLASS=""
curl -X POST \
"https://app.bitgo-test.com/api/evs/v1/identity/$IDENTITY_ID/document" \
-H "Authorization: Bearer $ACCESS_TOKEN" \
-F "selectedIdClass=$ID_CLASS" \
-F "frontPhoto=@" \
-F "backPhoto=@" \
-F "proofOfResidency=@"
```
```js JavaScript
import superagent from 'superagent';
import FormData from 'form-data';
import fs from 'fs';
const ACCESS_TOKEN = '';
const identityId = '';
const idClass = '';
const apiUrl = `https://app.bitgo-test.com/api/evs/v1/identity/${identityId}/document`;
const formData = new FormData();
formData.append('selectedIdClass', idClass);
formData.append('frontPhoto', fs.createReadStream(''));
formData.append('backPhoto', fs.createReadStream(''));
formData.append('proofOfResidency', fs.createReadStream(''));
const response = await superagent
.post(apiUrl)
.set('Authorization', `Bearer ${ACCESS_TOKEN}`)
.send(formData);
```
#### Step Result
BitGo returns the following:
* The document ID - A unique ID for the document submission. Store this ID for use if you need to update the document submission.
* The document status - the initial status is `pending` which confirms that BitGo has received the document. Other possible statuses include:
- `processing` - BitGo is validating the document
- `approved` - BitGo successfully verified the document
- `rejected` - The document failed verification
* The list of files that you uploaded for the end user including details such as file upload status, document type, and size.
```json JSON
{
"id": "02f3186c-8589-4lfa-a800-1e5cc169c726",
"status": "pending",
"selectedIdClass": "pp",
"fileUploads": [
{
"fileName": "passport-front.jpeg",
"fileSize": 11275,
"uploadStatus": "pending",
"documentType": "frontPhoto"
}
]
}
```
BitGo processes the documents with the following workflow:
1. **Initial receipt** - The end user's KYC status updates to `records uploaded`.
2. **Automated validation** - BitGo runs automated checks on the submitted documents.
3. Then, one of the following occurs:
- **Validation passed or failed with no retry attempts remaining:** - The end user's status updates to `in review` for manual review by BitGo.
- **Validation failed (with retry attempts remaining):** The end user's status updates to `incomplete verifications`, and you must re-upload improved documentation.
### 3.2 Get Documents
After submitting documents, you can retrieve the document details to check upload status and verify file information.
>Endpoint: [Get KYC Document](/reference/entityvalidationidentitydocumentget)
```shell cURL
export ACCESS_TOKEN=""
export IDENTITY_ID=""
export DOCUMENT_ID=""
curl -X GET \
"https://app.bitgo-test.com/api/evs/v1/identity/document?identityId=$IDENTITY_ID&documentId=$DOCUMENT_ID" \
-H "Content-Type: application/json" \
-H "Authorization: Bearer $ACCESS_TOKEN"
```
```js JavaScript
import superagent from 'superagent';
const ACCESS_TOKEN = '';
const identityId = '';
const documentId = '';
const apiUrl = `https://app.bitgo-test.com/api/evs/v1/identity/document?identityId=${identityId}&documentId=${documentId}`;
const response = await superagent
.get(apiUrl)
.set('Content-Type', 'application/json')
.set('Authorization', `Bearer ${ACCESS_TOKEN}`);
```
> 📘 **Note**
>
> You can query by either `identityId` or `documentId`, or both. At least one parameter is required.
#### Step Result
```json JSON
{
"documents": [
{
"id": "02f3186c-8589-4lfa-a800-1e5cc169c726",
"status": "processing",
"selectedIdClass": "pp",
"fileUploads": [
{
"fileName": "passport-front.jpeg",
"fileSize": 11275,
"uploadStatus": "uploaded",
"documentType": "frontPhoto"
},
{
"fileName": "passport-back.jpeg",
"fileSize": 10842,
"uploadStatus": "uploaded",
"documentType": "backPhoto"
}
]
}
]
}
```
### 3.3 Update Documents
You can only update documents when the KYC status is `incomplete verifications`. [Verify the status](#2-check-kyc-status) before proceeding.
>Endpoint: [Update KYC Document](/reference/entityvalidationidentitydocumentupdate)
```shell cURL
export IDENTITY_ID=""
export ACCESS_TOKEN=""
export ID_CLASS=""
export DOCUMENT_ID="" # The ID of the document initially created
curl -X PUT \
"https://app.bitgo-test.com/api/evs/v1/identity/$IDENTITY_ID/document/$DOCUMENT_ID" \
-H "Authorization: Bearer $ACCESS_TOKEN" \
-F "selectedIdClass=$ID_CLASS" \
-F "frontPhoto=@" \
-F "backPhoto=@" \
-F "proofOfResidency=@"
```
```js JavaScript
import superagent from 'superagent';
import FormData from 'form-data';
import fs from 'fs';
const ACCESS_TOKEN = '';
const identityId = '';
const idClass = '';
const documentId = ''; // The ID of the document initially created
const apiUrl = `https://app.bitgo-test.com/api/evs/v1/identity/${identityId}/document/${documentId}`;
const formData = new FormData();
formData.append('selectedIdClass', idClass);
formData.append('frontPhoto', fs.createReadStream(''));
formData.append('backPhoto', fs.createReadStream(''));
formData.append('proofOfResidency', fs.createReadStream(''));
const response = await superagent
.put(apiUrl)
.set('Authorization', `Bearer ${ACCESS_TOKEN}`)
.send(formData);
```
#### Step Result
```json JSON
{
"id": "02f3186c-8589-4lfa-a800-1e5cc169c726",
"status": "pending",
"selectedIdClass": "pp",
"fileUploads": [
{
"fileName": "passport-front.jpeg",
"fileSize": 11275,
"uploadStatus": "pending",
"documentType": "frontPhoto"
}
]
}
```
## 4. Sign Completed KYC
Once BitGo approves the KYC verification, your end user must sign to confirm. You can repeat step 2, Check KYC Status, to verify when the end user is `awaiting signature`.
>Endpoint: [Submit KYC Signatures](/reference/entityvalidationidentitysignatures)
```shell cURL
export IDENTITY_ID=""
export ACCESS_TOKEN=""
curl -X POST \
"https://app.bitgo-test.com/api/evs/v1/identity/$IDENTITY_ID/signatures" \
-H "Content-Type: application/json" \
-H "Authorization: Bearer $ACCESS_TOKEN" \
-d '[
{
"contractSignerNameFull": "John Smith",
"contractSignedDate": "2025-03-13 13:14:09.767480+00:00",
"contractSignedIPAddress": "123.123.123.123",
"contractVersion": "1.0",
"contractType": "csa",
"userAgreesToTerms": true
},
{
"contractSignerNameFull": "John Smith",
"contractSignedDate": "2025-03-13 13:14:09.767480+00:00",
"contractSignedIPAddress": "123.123.123.123",
"contractVersion": "1.0",
"contractType": "mpa",
"userAgreesToTerms": true
},
{
"contractSignerNameFull": "Jerry Smith",
"contractSignedDate": "2025-03-13 13:14:09.767480+00:00",
"contractSignedIPAddress": "123.123.123.123",
"contractVersion": "1.0",
"contractType": "mic",
"userAgreesToTerms": true
}
]'
```
```js JavaScript
import superagent from 'superagent';
const ACCESS_TOKEN = '';
const IDENTITY_ID = '';
const apiUrl = `https://app.bitgo-test.com/api/evs/v1/identity/${IDENTITY_ID}/signatures`;
const params = [
{
"contractSignerNameFull": "John Smith",
"contractSignedDate": "2025-03-13 13:14:09.767480+00:00",
"contractSignedIPAddress": "123.123.123.123",
"contractVersion": "1.0",
"contractType": "csa",
"userAgreesToTerms": true
},
{
"contractSignerNameFull": "Jay Smith",
"contractSignedDate": "2025-03-13 13:14:09.767480+00:00",
"contractSignedIPAddress": "123.123.123.123",
"contractVersion": "1.0",
"contractType": "mpa",
"userAgreesToTerms": true
},
{
"contractSignerNameFull": "Jerry Smith",
"contractSignedDate": "2025-03-13 13:14:09.767480+00:00",
"contractSignedIPAddress": "123.123.123.123",
"contractVersion": "1.0",
"contractType": "mic",
"userAgreesToTerms": true
}
];
response = await superagent
.post(apiUrl)
.set('Authorization', `Bearer ${ACCESS_TOKEN}`)
.set('Accept', 'application/json')
.send(params);
```
#### Step Result
```json JSON
{
"id": "cf5d766d-bef1-4874-8b02-54ded0e8333e",
"status": "signature submitted",
"organizationId": "6573806ef79cafdd1aff42fbffc2ab20",
"enterpriseId": "67d28e40ea178ede86f296ac90032286",
"userId": "67d28e3dea178ede86f2962e959865a0",
"updatedAt": "2025-03-13T07:59:52.564Z",
"createdAt": "2025-03-13T07:54:18.842Z",
"errorDescription": "",
"signaturesSubmitted": ["", ""],
"signaturesRequired": []
}
```
## Simulating KYC Flows
You can simulate different KYC verification flows to test your integration without manual review from BitGo.
The `debugStatus` field enables you to control the KYC verification flow during testing. It accepts `failed` and `passed` as valid values and defaults to `passed`.
You can also pass `debugFailureReason` to get more specific errors on the identity `errorDescription`, this does not impact the KYC flow and is supplementary to `debugStatus`. Some possible values with specific error message mappings are: `expired`, `cannot_verify_id`, `portrait_not_found`, `portrait_not_clear`, `face_mismatch`, etc.
You can set both `debugStatus` and `debugFailureReason` when creating an identity and you can only update these fields when the identity status is `awaiting document upload` or `incomplete verifications` using the [Update KYC Identity](/reference/entityvalidationidentityupdate) endpoint.
> 📘 **Note**
>
> The following test paths are only available in the BitGo test environment.
This path simulates the fastest approval scenario where document upload is not required.
#### Steps
1. Create an identity for a non-PEP (politically exposed person) US citizen without the `debugStatus` parameter.
- **Recommendation**: Avoid using New York (NY) as the state, as NY-based identities may sometimes require additional documentation.
2. The identity status automatically progresses to `awaiting signature`, bypassing document upload.
3. Submit the required signatures.
#### Expected Outcome
The identity status updates to `approved` without requiring document upload.
This path simulates approval after document upload and review.
#### Steps
1. Create an identity for a non-US citizen/PEP or set `debugStatus` to `failed`.
2. The identity status updates to `awaiting document upload`.
3. **Important**: If you initially set `debugStatus` to `failed`, update it to `passed`.
4. Submit the identity verification documents.
5. The identity status progresses from `in review` to `awaiting signature`.
6. Submit the required signatures.
#### Expected Outcome
The identity status updates to `approved` after successful document verification and signature submission.
This path simulates the resubmission workflow when initial document verification fails.
#### Steps
1. Create an identity for a non-US citizen/PEP or set `debugStatus` to `failed`.
2. The identity status updates to `awaiting document upload`.
3. **Important**: Ensure `debugStatus` is set to `failed`. If not, update the identity.
4. Submit the identity verification documents.
5. The identity status updates to `incomplete verifications`.
6. Update `debugStatus` to `passed` on the identity.
7. Resubmit improved documents.
8. The identity status progresses from `in review` to `awaiting signature`.
9. Submit the required signatures.
#### Expected Outcome
The identity status updates to `approved` after successful document resubmission and signature submission.
> 📘 **Note**
>
> BitGo enables a limited number of resubmission attempts when the status is `incomplete verifications`. Use this path to test your error handling and resubmission logic.
This path simulates a declined KYC after exhausting all resubmission attempts.
#### Steps
1. Create an identity for a non-US citizen/PEP or set `debugStatus` to `failed`.
2. The identity status updates to `awaiting document upload`.
3. **Important**: Ensure `debugStatus` is set to `failed` and **remains set to `failed`** throughout all submission attempts.
4. Submit the identity verification documents.
5. The identity status updates to `incomplete verifications`.
6. Repeat document submission until you exhaust all attempts.
7. After the final failed attempt, the identity status automatically progresses from `in review` to `declined`.
#### Expected Outcome
The identity status updates to `declined` after exhausting all resubmission attempts with failed verifications.
> 📘 **Note**
>
> Use this path to test your integration's handling of declined KYC scenarios and ensure your application properly notifies end users when BitGo rejects their KYC.
## Overview
Use this flow when your platform holds a license issued by an European Union (EU) or European Economic Area (EEA) financial authority, such as a MiCAR Crypto-Asset Service Provider (CASP) license or an e-money institution license. Your platform carries independent compliance obligations alongside BitGo's.
Ensure your onboarding flow requires each EEA customer to execute the Custodial Services Agreement and Electronic Trading Agreement (Schedules B-1 and B-2) before they access BitGo Services.
## KYC Lifecycle
EU KYC is simpler than the US KYC, because it doesn't require uploading documents. BitGo handles KYC for EU individuals through an identity verification (IDV) flow that your end users complete during onboarding.
EU identity states:
1. `initiating` — BitGo confirms receipt of the end user's KYC information.
2. `evaluating submission` — Automated checks run on the submitted information.
3. `input error` — Name or birthdate fields contain formatting issues. You must update the identity before it can proceed.
4. `in review` — BitGo manually reviews the KYC information.
5. `awaiting signature` — BitGo completes review and requires the end user to confirm verification with a signature.
6. `signature submitted` — The end user has signed; final processing is in progress.
7. `approved` or `declined` — Final outcome of the KYC review.
Unlike the US flow, EU identities don't enter `awaiting document upload` or `incomplete verifications` states.
## 1. Submit KYC
Submit KYC information for your end user.
>Endpoint: [Create KYC Identity](/reference/entityvalidationidentitycreate)
```shell cURL
export ACCESS_TOKEN=""
export ORGANIZATION_ID=""
curl -X POST \
https://app.bitgo-test.com/api/evs/v1/identity \
-H "Content-Type: application/json" \
-H "Authorization: Bearer $ACCESS_TOKEN" \
-d '{
"enterpriseId": "59cd72485007a239fb00282ed480da1f",
"userId": "67d28e3dea178ede86f2962e959865a0",
"organizationId": "'"$ORGANIZATION_ID"'",
"externalUserId": "external-user-hans-mueller-001",
"transactionType": "euIndividual",
"nameFirst": "Hans",
"nameLast": "Müller",
"dateOfBirth": {
"year": "1985",
"month": "06",
"day": "15"
},
"cityOfBirth": "Frankfurt am Main",
"countryOfBirth": "DEU",
"countryOfCitizenship": "DEU",
"countryOfResidence": "DEU",
"taxId": "12345678901",
"countryOfTaxResidence": "DEU",
"industry": "Software & IT Services",
"employmentStatus": "Employee",
"sourceOfFunds": "Income from Employment",
"email": "hans.mueller@example.com",
"phoneNumber": "+4969123456789",
"politicallyExposedPerson": false,
"idvPerformed": true,
"initialKycCompletionDate": {
"year": "2024",
"month": "01",
"day": "10"
},
"lastKycCompletionDate": {
"year": "2025",
"month": "03",
"day": "13"
},
"govIdType": "pp",
"govIdNumber": "C01X00T47",
"govIdExpiry": {
"year": "2030",
"month": "12",
"day": "31"
},
"govIdCountryOfIssuance": "DEU",
"addressStreet1": "Mainzer Landstraße 50",
"addressCity": "Frankfurt am Main",
"addressPostalCode": "60325",
"debugStatus": "passed",
"debugFailureReason": ""
}'
```
* Use `"transactionType": "euIndividual"` to route the identity to BitGo Europe GmbH.
* Use ISO 3166-1 country codes for `countryOfCitizenship`, `countryOfResidence`, `countryOfBirth`, `countryOfTaxResidence`, and `govIdCountryOfIssuance`. The API accepts both alpha-2 (`"DE"`) and alpha-3 (`"DEU"`) formats.
* Provide `taxId` (EU tax identification number) instead of `identificationNumber` (US SSN/ITIN), which does not apply to EU individuals.
* Date fields (`dateOfBirth`, `govIdExpiry`, `initialKycCompletionDate`, `lastKycCompletionDate`) accept a `{ "year", "month", "day" }` object, not the ISO timestamp strings used by the US schema. The `lastKycCompletionDate` value must fall within the last 2 years.
* `industry`, `employmentStatus`, and `sourceOfFunds` are required enums. Accepted `sourceOfFunds` values: `"Income from Employment"`, `"Pension"`, `"Income from Renting and Leasing"`, `"Income from Self-Employment"`, `"Inheritance / Gift"`, `"Crypto"`, `"Other Financial Support"`.
* `govIdType` accepts: `pp` (passport), `ppc` (passport card), `rp` (residence permit), `pr` (permanent residence), `id` (national ID). For `EURegulated` enterprises, all four government ID fields are required: `govIdType`, `govIdNumber`, `govIdExpiry`, and `govIdCountryOfIssuance`.
#### Step Result
You create an identity for KYC purposes and BitGo returns the `id` and `status` of the created identity. The status is `initiating` which confirms that BitGo has received the end user's KYC information and is reviewing it.
```json JSON
{
"id": "993ec85b-ad23-4259-bde5-703a071a0783",
"status": "initiating"
}
```
## 2. Check KYC Status
Check the KYC status of your end user to determine next steps.
>Endpoint: [Get KYC Identity](/reference/entityvalidationidentityget)
```shell cURL
export ACCESS_TOKEN=""
export ORGANIZATION_ID=""
export ENTERPRISE_ID=""
export IDENTITY_ID=""
curl -X GET \
"https://app.bitgo-test.com/api/evs/v1/identity?organizationId=$ORGANIZATION_ID&enterpriseId=$ENTERPRISE_ID&identityId=$IDENTITY_ID" \
-H "Content-Type: application/json" \
-H "Authorization: Bearer $ACCESS_TOKEN"
```
```js JavaScript
import superagent from 'superagent';
const ACCESS_TOKEN = '';
const organizationId = '';
const enterpriseId = '';
const identityId = '';
const apiUrl = `https://app.bitgo-test.com/api/evs/v1/identity?organizationId=${organizationId}&enterpriseId=${enterpriseId}&identityId=${identityId}`;
const response = await superagent
.get(apiUrl)
.set('Authorization', `Bearer ${ACCESS_TOKEN}`);
```
> 📘 **Note**
>
> Use both the organization and enterprise IDs to successfully fetch your end user KYC identity.
#### Step Result
BitGo returns one of the following KYC statuses:
* `initiating` - BitGo confirms receipt of the end user's KYC information.
* `evaluating submission` - BitGo runs automated checks on the submitted KYC information.
* `input error` - The name or birthdate fields contain formatting issues. You must update the identity with properly formatted input fields.
* `in review` - BitGo manually reviews the KYC information.
* `awaiting signature` - BitGo completes review of the KYC information and now requires you to confirm verification with a signature.
* `approved` - BitGo approves your end user's KYC verification and marks it as complete.
* `declined` - BitGo declines your end user's KYC verification.
```json JSON
{
"identities": [
{
"id": "5436ff2e-1129-49f1-8334-1510955ffe00",
"status": "in review",
"organizationId": "68928b9066417fe09212fe9965c88552",
"enterpriseId": "690a234346b3252214cdaf72070c549e",
"userId": "690a234046b3252214cdadfe8600df80",
"createdAt": "2025-11-04T16:05:15.359Z",
"updatedAt": "2025-11-04T16:05:17.975Z",
"signaturesSubmitted": [],
"signaturesRequired": []
}
]
}
```
## 3. Sign Completed KYC
Once BitGo approves the KYC verification, your end user must sign to confirm. You can repeat step 2, Check KYC Status, to verify when the end user is `awaiting signature`.
Your organization's agreements with BitGo determine the required `contractType` values — contact BitGo if you are unsure which contract types apply to your integration.
Each signature object serves as a digital record of the end user's agreement. The `contractSignerNameFull`, `contractSignedDate`, and `contractSignedIPAddress` fields together capture the full name, timestamp, and IP address that constitute the electronic signature.
>Endpoint: [Submit KYC Signatures](/reference/entityvalidationidentitysignatures)
```shell cURL
export IDENTITY_ID=""
export ACCESS_TOKEN=""
curl -X POST \
"https://app.bitgo-test.com/api/evs/v1/identity/$IDENTITY_ID/signatures" \
-H "Content-Type: application/json" \
-H "Authorization: Bearer $ACCESS_TOKEN" \
-d '[
{
"contractSignerNameFull": "Hans Müller",
"contractSignedDate": "2025-03-13 13:14:09.767480+00:00",
"contractSignedIPAddress": "123.123.123.123",
"contractVersion": "1.0",
"contractType": "",
"userAgreesToTerms": true
}
]'
```
#### Step Result
```json JSON
{
"id": "cf5d766d-bef1-4874-8b02-54ded0e8333e",
"status": "signature submitted",
"organizationId": "6573806ef79cafdd1aff42fbffc2ab20",
"enterpriseId": "67d28e40ea178ede86f296ac90032286",
"userId": "67d28e3dea178ede86f2962e959865a0",
"updatedAt": "2025-03-13T07:59:52.564Z",
"createdAt": "2025-03-13T07:54:18.842Z",
"errorDescription": "",
"signaturesSubmitted": ["", ""],
"signaturesRequired": []
}
```
## Overview
Use this flow when your platform does not hold a license issued by a European Union (EU)/European Economic Area (EEA) financial authority. Your platform has no independent licensing obligations, however all BitGo onboarding requirements still apply to your integration.
Ensure your onboarding flow requires each EEA customer to execute the Custodial Services Agreement and Electronic Trading Agreement (Schedules B-1 and B-2) before they access BitGo Services.
## KYC Lifecycle
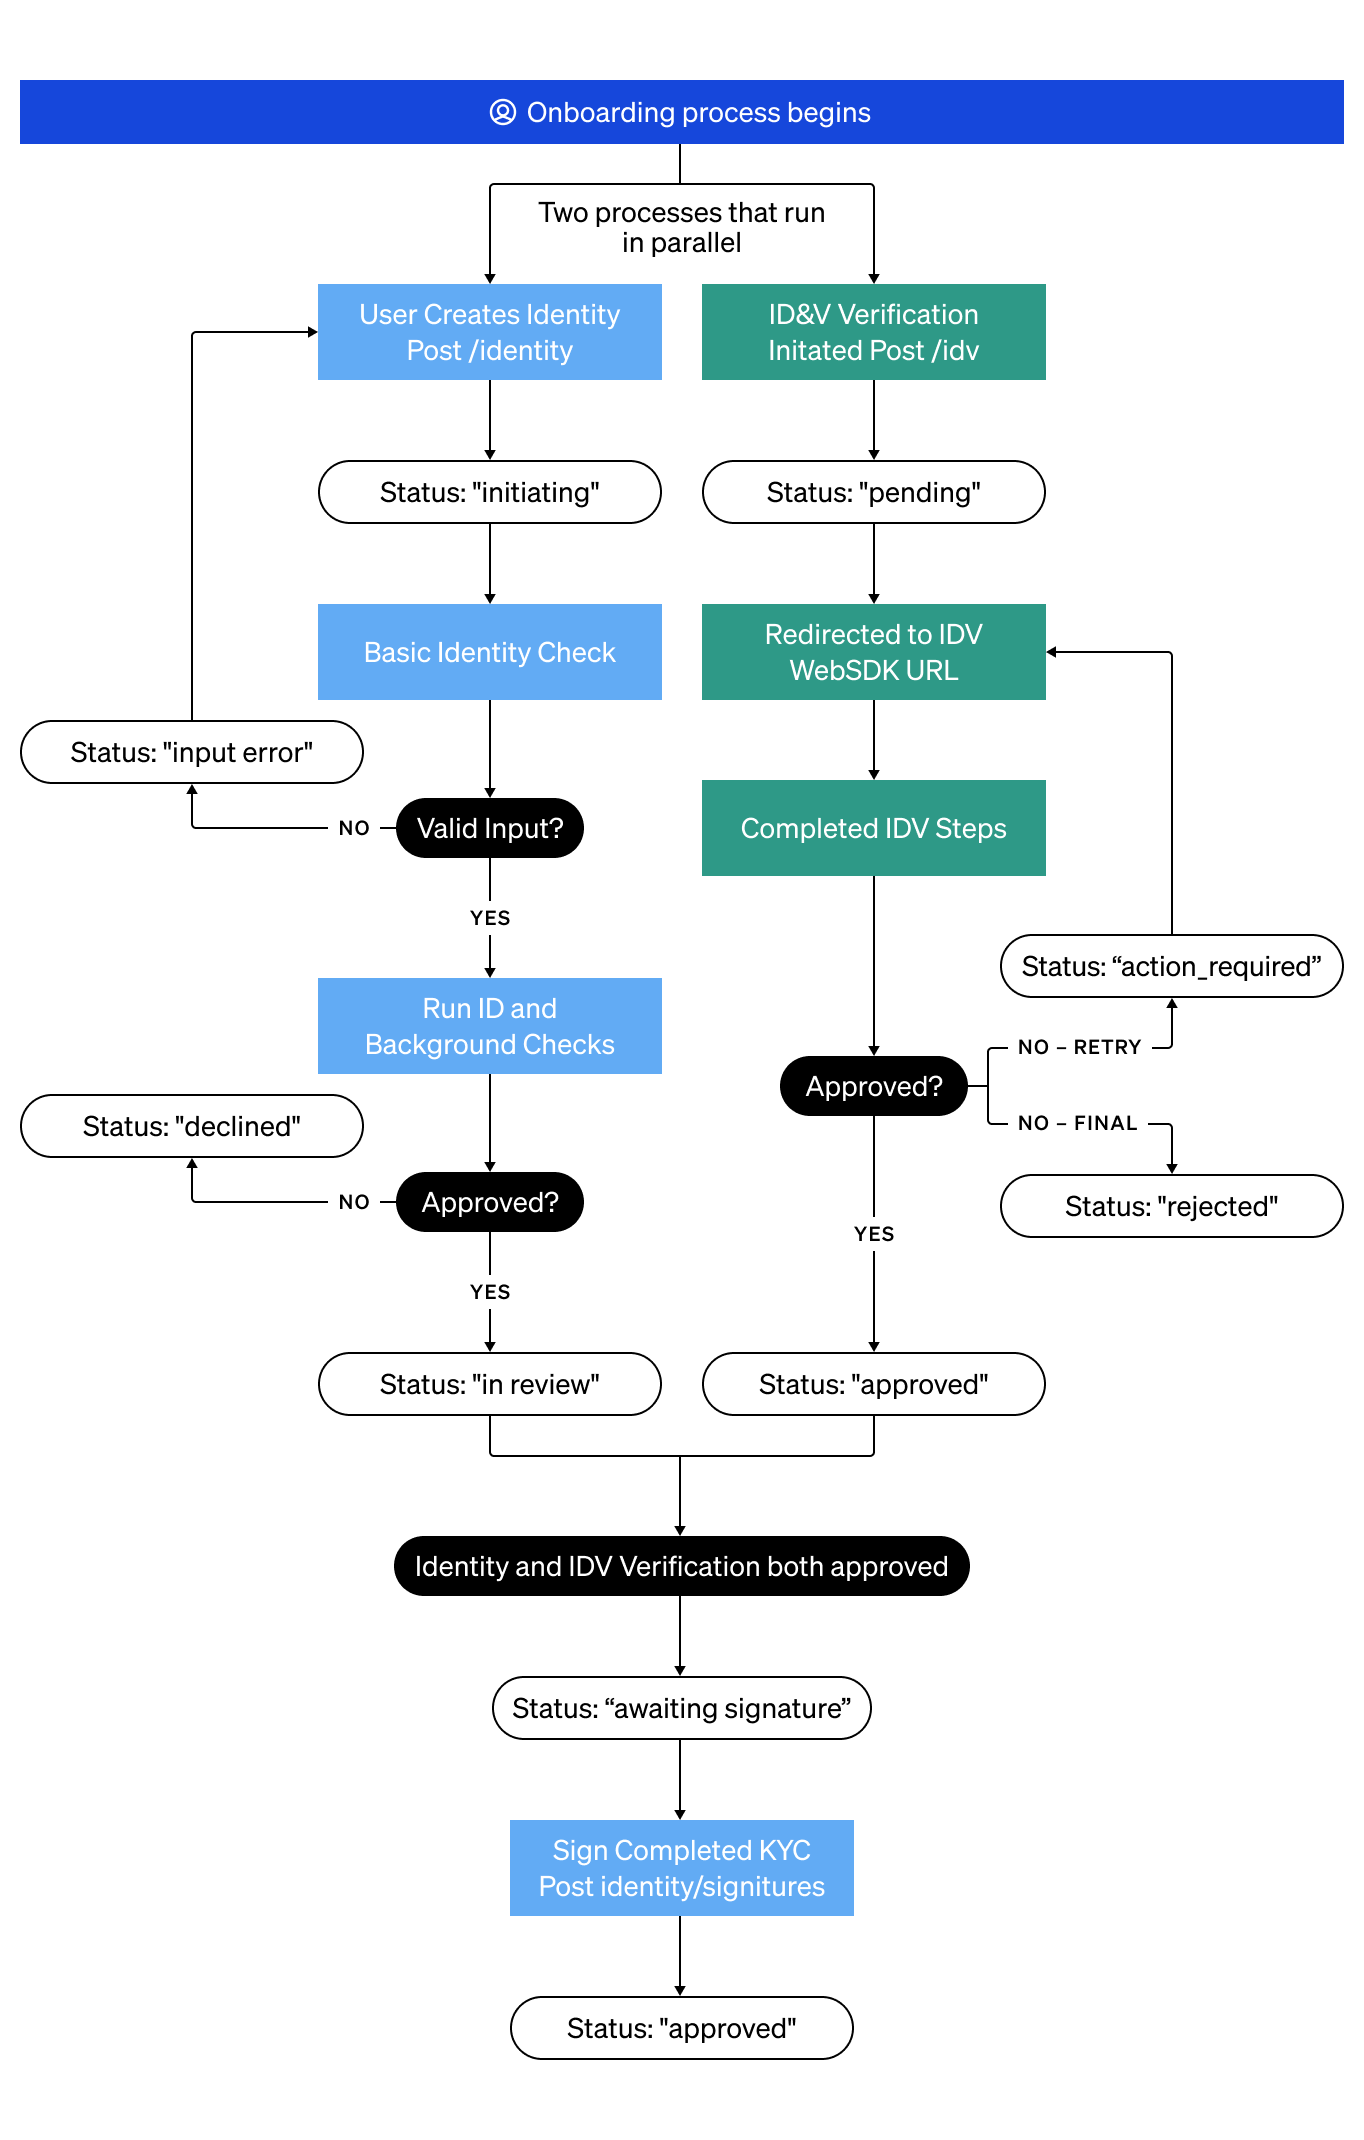
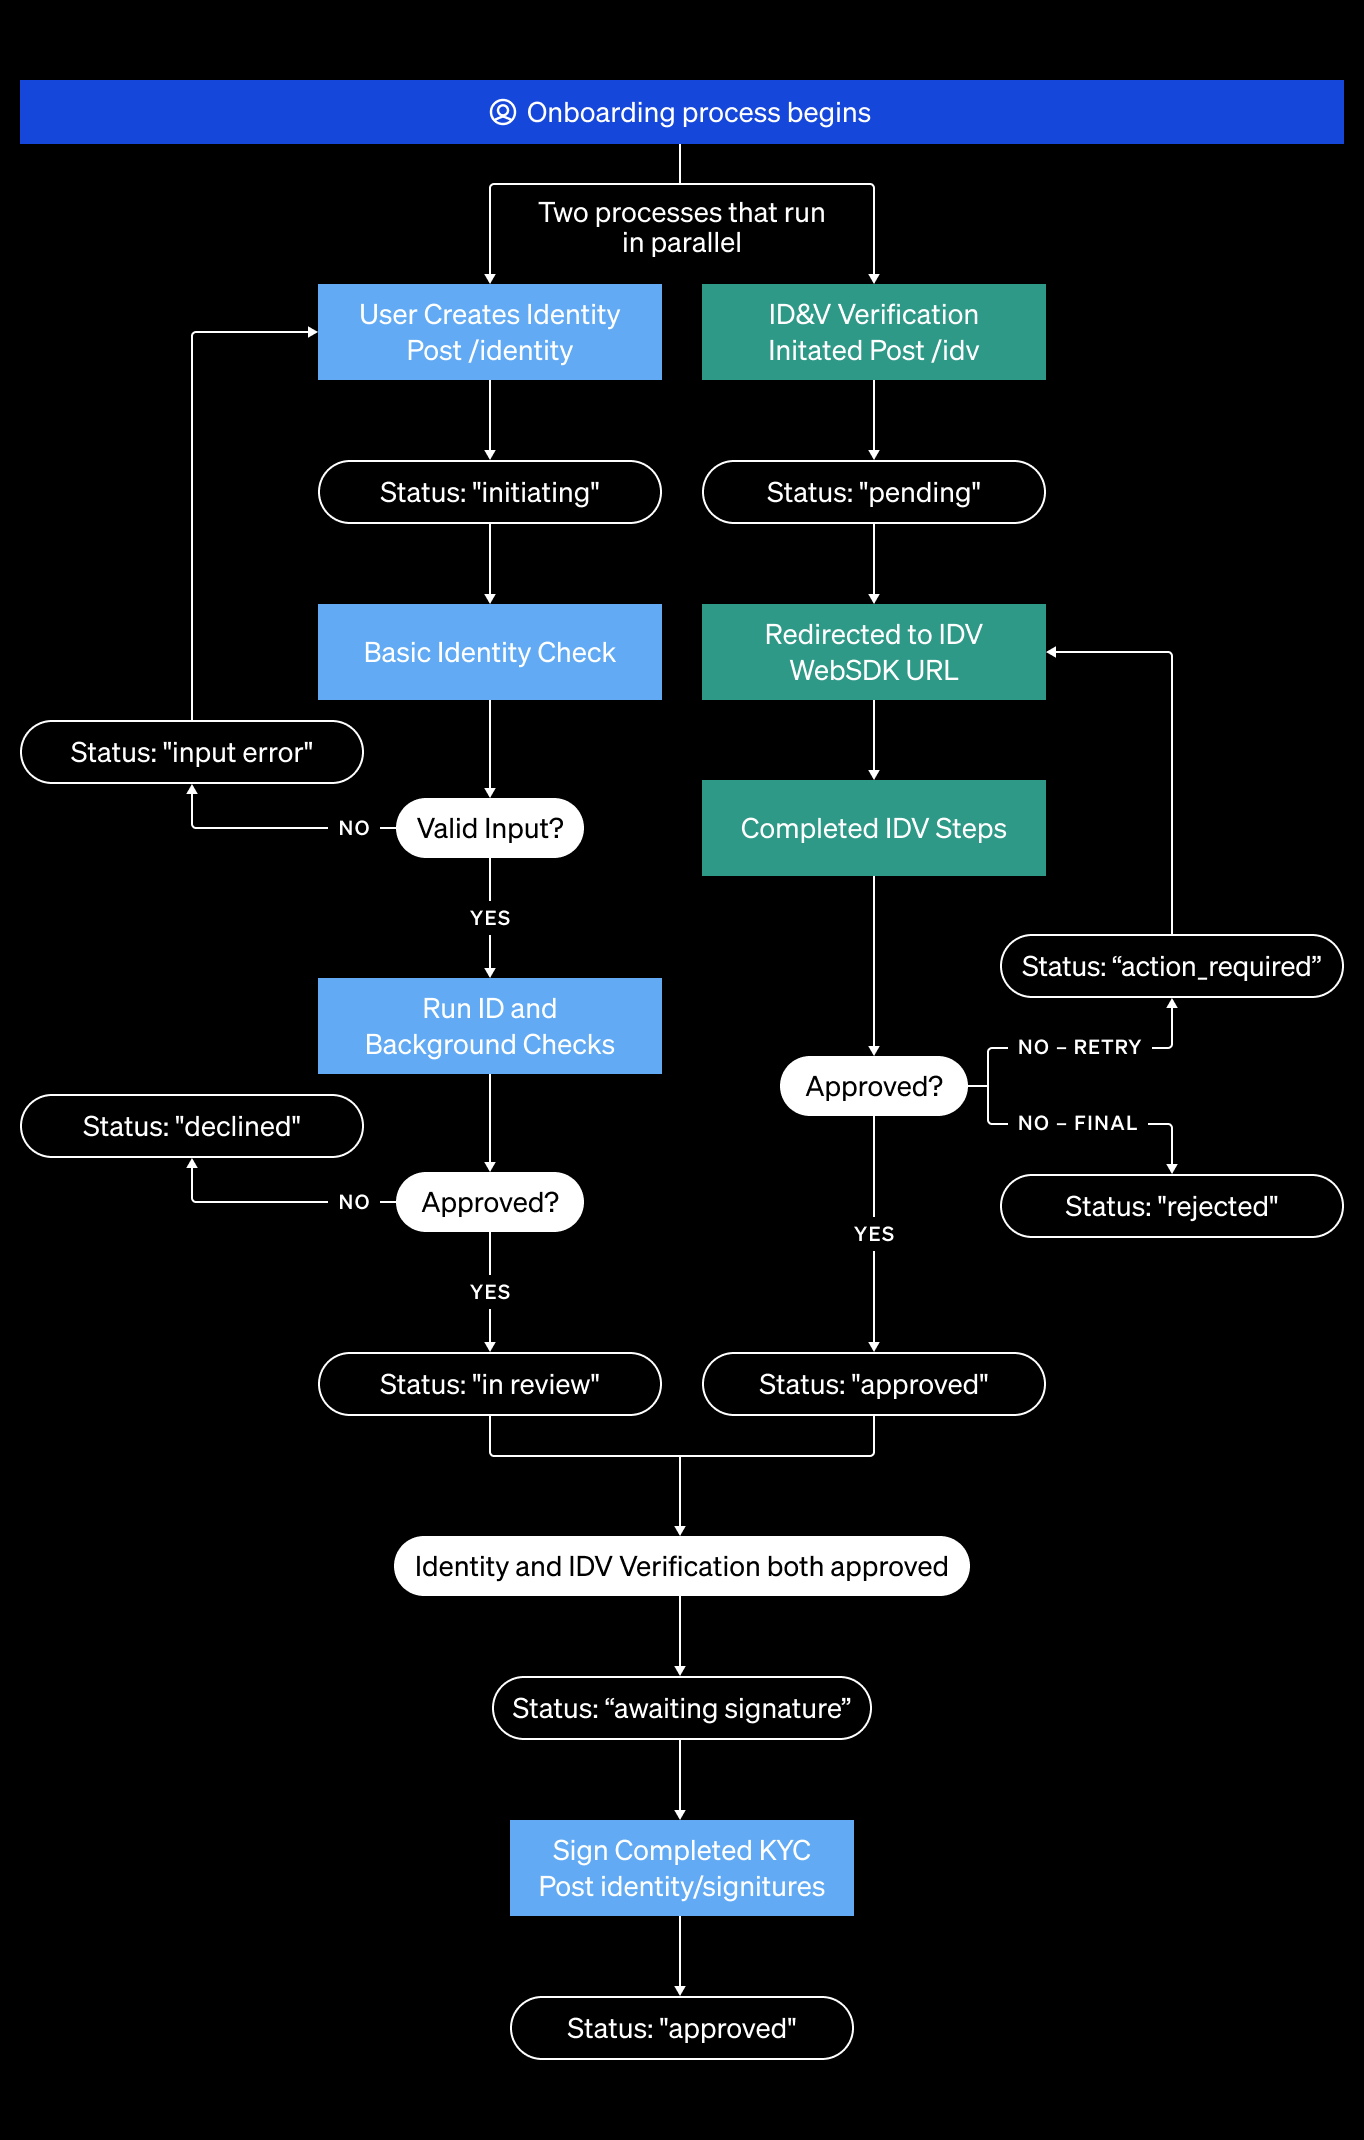
The EU unregulated KYC lifecycle requires a dual-approval model. Your end users must pass both a standard identity check and an IDV step before BitGo clears them. The identity check and IDV run independently, so you don't need to wait for one to complete before starting the other.
 ## 1. Submit KYC
Submit basic KYC information for your user.
>Endpoint: [Create KYC Identity](/reference/entityvalidationidentitycreate)
```shell cURL
export ACCESS_TOKEN=""
export ORGANIZATION_ID=""
curl -X POST \
https://app.bitgo-test.com/api/evs/v1/identity \
-H "Content-Type: application/json" \
-H "Authorization: Bearer $ACCESS_TOKEN" \
-d '{
"enterpriseId": "59cd72485007a239fb00282ed480da1f",
"userId": "67d28e3dea178ede86f2962e959865a0",
"organizationId": "'"$ORGANIZATION_ID"'",
"externalUserId": "external-user-hans-mueller-001",
"transactionType": "euIndividual",
"nameFirst": "Hans",
"nameLast": "Müller",
"dateOfBirth": {
"year": "1985",
"month": "06",
"day": "15"
},
"cityOfBirth": "Frankfurt am Main",
"countryOfBirth": "DEU",
"countryOfCitizenship": "DEU",
"countryOfResidence": "DEU",
"taxId": "12345678901",
"countryOfTaxResidence": "DEU",
"industry": "Software & IT Services",
"employmentStatus": "Employee",
"sourceOfFunds": "Income from Employment",
"email": "hans.mueller@example.com",
"phoneNumber": "+4969123456789",
"politicallyExposedPerson": false,
"idvPerformed": false,
"initialKycCompletionDate": {
"year": "2024",
"month": "01",
"day": "10"
},
"lastKycCompletionDate": {
"year": "2025",
"month": "03",
"day": "13"
},
"addressStreet1": "Mainzer Landstraße 50",
"addressCity": "Frankfurt am Main",
"addressPostalCode": "60325",
"debugStatus": "passed",
"debugFailureReason": ""
}'
```
**EU unregulated identity statuses**
1. `initiating` — BitGo confirms receipt of the end user's KYC information.
2. `input error` — Name or birthdate fields contain formatting issues. You must update the identity before it can proceed.
3. `in review` — BitGo reviews the KYC information.
4. `awaiting signature` — BitGo completes review and requires the end user to confirm verification with a signature.
5. `signature submitted` — The end user has signed; final processing is in progress.
6. `approved` or `declined` — Final outcome of the KYC review.
#### Step Result
You create an identity for KYC purposes and BitGo returns the `id` and `status` of the created identity. The status is `initiating` which confirms that BitGo has received the end user's KYC information and is reviewing it.
```json JSON
{
"id": "993ec85b-ad23-4259-bde5-703a071a0783",
"status": "initiating"
}
```
## 2. (Optional) Check KYC Status
Check the KYC status of your end user to determine next steps.
>Endpoint: [Get KYC Identity](/reference/entityvalidationidentityget)
```shell cURL
export ACCESS_TOKEN=""
export ORGANIZATION_ID=""
export ENTERPRISE_ID=""
export IDENTITY_ID=""
curl -X GET \
"https://app.bitgo-test.com/api/evs/v1/identity?organizationId=$ORGANIZATION_ID&enterpriseId=$ENTERPRISE_ID&identityId=$IDENTITY_ID" \
-H "Content-Type: application/json" \
-H "Authorization: Bearer $ACCESS_TOKEN"
```
```js JavaScript
import superagent from 'superagent';
const ACCESS_TOKEN = '';
const organizationId = '';
const enterpriseId = '';
const identityId = '';
const apiUrl = `https://app.bitgo-test.com/api/evs/v1/identity?organizationId=${organizationId}&enterpriseId=${enterpriseId}&identityId=${identityId}`;
const response = await superagent
.get(apiUrl)
.set('Authorization', `Bearer ${ACCESS_TOKEN}`);
```
> 📘 **Note**
>
> You can create an organization webhook with the `identityStatus` type to receive automatic notifications when a user's identity status changes. For details, see [Create Webhooks](/docs/crypto-as-a-service-webhooks).
#### Step Result
BitGo returns one of the following KYC statuses:
* `initiating` - BitGo confirms receipt of the end user's KYC information.
* `input error` - The name or birthdate fields contain formatting issues. You must update the identity with properly formatted input fields.
* `in review` - BitGo reviews the KYC information.
* `awaiting signature` - BitGo completes review of the KYC information and now requires you to confirm verification with a signature.
* `approved` - BitGo approves your end user's KYC verification and marks it as complete.
* `declined` - BitGo declines your end user's KYC verification.
```json JSON
{
"identities": [
{
"id": "5436ff2e-1129-49f1-8334-1510955ffe00",
"status": "in review",
"organizationId": "68928b9066417fe09212fe9965c88552",
"enterpriseId": "690a234346b3252214cdaf72070c549e",
"userId": "690a234046b3252214cdadfe8600df80",
"createdAt": "2025-11-04T16:05:15.359Z",
"updatedAt": "2025-11-04T16:05:17.975Z",
"signaturesSubmitted": [],
"signaturesRequired": []
}
]
}
```
## 3. Sign Completed KYC
Once BitGo approves the KYC verification, your end user must sign to confirm. You can repeat [Step 2](/docs/crypto-as-a-service-know-your-customer#2-check-kyc-status), Check KYC Status, to verify when the end user is `awaiting signature`.
Your organization's agreements with BitGo determine the required `contractType` values. If you're unsure which contract types apply to your integration, contact your customer service manager (CSM) or support@bitgo.com.
Each signature object serves as a digital record of the end user's agreement. The `contractSignerNameFull`, `contractSignedDate`, and `contractSignedIPAddress` fields together capture the full name, timestamp, and IP address that constitute the electronic signature.
>Endpoint: [Submit KYC Signatures](/reference/entityvalidationidentitysignatures)
```shell cURL
export IDENTITY_ID=""
export ACCESS_TOKEN=""
curl -X POST \
"https://app.bitgo-test.com/api/evs/v1/identity/$IDENTITY_ID/signatures" \
-H "Content-Type: application/json" \
-H "Authorization: Bearer $ACCESS_TOKEN" \
-d '[
{
"contractSignerNameFull": "Hans Müller",
"contractSignedDate": "2025-03-13 13:14:09.767480+00:00",
"contractSignedIPAddress": "123.123.123.123",
"contractVersion": "1.0",
"contractType": "",
"userAgreesToTerms": true
}
]'
```
#### Step Result
```json JSON
{
"id": "cf5d766d-bef1-4874-8b02-54ded0e8333e",
"status": "signature submitted",
"organizationId": "6573806ef79cafdd1aff42fbffc2ab20",
"enterpriseId": "67d28e40ea178ede86f296ac90032286",
"userId": "67d28e3dea178ede86f2962e959865a0",
"updatedAt": "2025-03-13T07:59:52.564Z",
"createdAt": "2025-03-13T07:54:18.842Z",
"errorDescription": "",
"signaturesSubmitted": ["", ""],
"signaturesRequired": []
}
```
## 4. Initiate IDV
After you create the identity, start the IDV process for your end user by redirecting them to the BitGo-hosted verification link.
You can call this endpoint at any point after creating your user's identity. If the user already has an IDV record, this endpoint returns a fresh link without creating a duplicate.
> Endpoint: [Initiate Sumsub IDV for a user](/reference/sumsubpostv1idv)
| Field | Type | Required | Description |
|-------|------|----------|-------------|
| `userId` | string | Yes | The BitGo user ID of the end user |
| `enterpriseId` | string | Yes | The BitGo child enterprise ID |
| `verificationType` | `penny-drop` or `video-id` | Yes | The verification flow to use |
| `sumsubShareToken` | string | No | Share token to copy an existing Sumsub applicant from your own Sumsub environment |
| `lang` | string | No | ISO 639-1 language code for the WebSDK UI (e.g. `"de"`, `"fr"`). Defaults to `"en"`. |
| `includeSdkToken` | boolean | No | When `true`, returns a Sumsub Mobile SDK token alongside the WebSDK URL. Only valid for `verificationType: "video-id"`. |
---
```shell cURL
export ACCESS_TOKEN=""
curl -X POST \
https://app.bitgo.com/api/sumsub-service/v1/idv \
-H "Content-Type: application/json" \
-H "Authorization: Bearer $ACCESS_TOKEN" \
-d '{
"userId": "",
"enterpriseId": "",
"verificationType": ""
}'
```
```shell cURL
# To reuse an existing Sumsub verification, first generate a share token from your
# Sumsub dashboard with `forClientId` set to `bitgo.com_146799`.
# See: https://docs.sumsub.com/reference/generate-share-token
# Then pass that share token in the `sumsubShareToken` field below so BitGo
# copies the existing applicant from your other Sumsub environment.
#
# In production, add BitGo as a sharing partner in your Sumsub dashboard.
# Contact your CSM or support@bitgo.com to request the BitGo partner token.
# See: https://docs.sumsub.com/docs/manage-sharing-partners
export ACCESS_TOKEN=""
curl -X POST \
https://app.bitgo.com/api/sumsub-service/v1/idv \
-H "Content-Type: application/json" \
-H "Authorization: Bearer $ACCESS_TOKEN" \
-d '{
"userId": "",
"enterpriseId": "",
"verificationType": "",
"sumsubShareToken": ""
}'
```
#### Step Result
BitGo returns an `idvId` and one of the following statuses:
* `pending` — The end user must complete verification. BitGo returns a WebSDK `url` and an `expiresAt` timestamp. Redirect the end user to the URL to complete the flow.
* `action_required` — IDV attempt encountered an issue with one or more steps. The end user must retry the flagged steps to complete verification. BitGo returns a fresh `url` and `expiresAt`.
* `approved` — BitGo approves the end user's IDV. No further action required.
* `rejected` — BitGo rejects the end user's IDV permanently.
When the status is `pending` or `action_required`, redirect the end user to the returned `url`, where they complete the steps for their verification type:
1. **Liveness Check**
* Identity document — User uploads a government-issued ID.
* Selfie — User completes a biometric scan to confirm their ID.
2. **Penny Test** — User initiates a small bank transaction to confirm their name matches their bank account. Allow up to 72 hours for this step to complete.
> 📘 **Note**
>
> In the test environment, BitGo skips the penny test step and completes verification without a real bank transaction.
1. **Identity Document** — User uploads a government-issued ID.
2. **Applicant Data** — User provides required personal information.
3. **Video Call** — User completes a live video session with a BitGo agent, including a selfie and phone verification.
> 📘 **Note**
>
> Video ID verification must be enabled for your organization before use. Contact your customer service manager (CSM) or support@bitgo.com to request access.
>
> In the test environment, BitGo skips the video call step and completes verification without a real video session.
BitGo receives the result automatically after the end user passes all steps. You don't need to take any further action.
Verification links expire after the time indicated in `expiresAt`. If a link expires before your end user completes verification, call this endpoint again with the same parameters to get a fresh link. BitGo reuses the existing verification record and doesn't create a duplicate.
```json JSON
{
"idvId": "a1b2c3d4-e5f6-7890-abcd-ef1234567890",
"status": "pending",
"url": "https://verify.example.com/p/abc123...",
"expiresAt": "2026-05-01T12:00:00Z"
}
```
## 5. (Optional) Check IDV Status
Poll this endpoint to check the current IDV status for an end user. This endpoint doesn't refresh the WebSDK URL — call the Initiate IDV endpoint in step 4 to retry or generate a new link.
> Endpoint: [Get Sumsub IDV status](/reference/sumsubgetv1idvid)
```shell cURL
export ACCESS_TOKEN=""
export IDV_ID=""
curl -X GET \
"https://app.bitgo.com/api/sumsub-service/v1/idv/$IDV_ID" \
-H "Authorization: Bearer $ACCESS_TOKEN"
```
> 📘 **Note**
>
> You can create an organization webhook with the `idvStatus` type to receive automatic notifications when a user's IDV status changes. For details, see [Create Webhooks](/docs/crypto-as-a-service-webhooks).
#### Step Result
BitGo returns the current status of the IDV record. The `status` field uses the same values as step 4 (`pending`, `action_required`, `approved`, `rejected`). When BitGo rejects an IDV, the `rejectLabels` array lists the reasons.
```json JSON
{
"idvId": "98f20884-f3ce-4949-a969-4a6010ae00e1",
"status": "approved",
"verificationType": "penny-drop",
"userId": "69fce210ac533caa20ef5bdcfc2ef3d4",
"enterpriseId": "69fce212ac533caa20ef5c13ff183e84",
"organizationId": "69e291d44afc2b668a3ac76d16fef106",
"rejectLabels": null
}
```
## 6. (Optional) Switch Verification Type
If an end user's IDV is in `pending` or `action_required` state, you can switch them from one verification type to another (for example, `penny-drop` to `video-id`). Returns a fresh WebSDK link for the new flow.
> 📘 **Note**
>
> Not available for share token (copy applicant) flows, or for IDVs that are already `approved` or permanently `rejected`. `video-id` must be enabled for your organization. Contact your CSM or support@bitgo.com to enable `video-id`.
> Endpoint: `POST /api/sumsub-service/v1/idv/:idvId/change-verification-type`
| Field | Type | Required | Description |
|-------|------|----------|-------------|
| `verificationType` | `penny-drop` or `video-id` | Yes | The verification flow to switch to. |
| `includeSdkToken` | boolean | No | When `true`, returns a Sumsub Mobile SDK token. Only valid for `video-id`. |
---
```shell cURL
export ACCESS_TOKEN=""
export IDV_ID=""
curl -X POST \
"https://app.bitgo.com/api/sumsub-service/v1/idv/$IDV_ID/change-verification-type" \
-H "Content-Type: application/json" \
-H "Authorization: Bearer $ACCESS_TOKEN" \
-d '{
"verificationType": "video-id"
}'
```
#### Step Result
```json JSON
{
"url": "https://verify.example.com/p/xyz789...",
"expiresAt": "2026-05-01T12:00:00Z"
}
```
## Next Steps
[Create Go Accounts](/docs/crypto-as-a-service-go-accounts) for your users.
## See Also
* [API Reference: Create KYC Identity](/reference/entityvalidationidentitycreate)
* [API Reference: Get KYC Identity](/reference/entityvalidationidentityget)
* [API Reference: Update KYC Identity](/reference/entityvalidationidentityupdate)
* [API Reference: Add KYC Documents](/reference/entityvalidationidentitydocumentcreate)
* [API Reference: Get KYC Document](/reference/entityvalidationidentitydocumentget)
* [API Reference: Update KYC Document](/reference/entityvalidationidentitydocumentupdate)
* [API Reference: Submit KYC Signatures](/reference/entityvalidationidentitysignatures)
## 1. Submit KYC
Submit basic KYC information for your user.
>Endpoint: [Create KYC Identity](/reference/entityvalidationidentitycreate)
```shell cURL
export ACCESS_TOKEN=""
export ORGANIZATION_ID=""
curl -X POST \
https://app.bitgo-test.com/api/evs/v1/identity \
-H "Content-Type: application/json" \
-H "Authorization: Bearer $ACCESS_TOKEN" \
-d '{
"enterpriseId": "59cd72485007a239fb00282ed480da1f",
"userId": "67d28e3dea178ede86f2962e959865a0",
"organizationId": "'"$ORGANIZATION_ID"'",
"externalUserId": "external-user-hans-mueller-001",
"transactionType": "euIndividual",
"nameFirst": "Hans",
"nameLast": "Müller",
"dateOfBirth": {
"year": "1985",
"month": "06",
"day": "15"
},
"cityOfBirth": "Frankfurt am Main",
"countryOfBirth": "DEU",
"countryOfCitizenship": "DEU",
"countryOfResidence": "DEU",
"taxId": "12345678901",
"countryOfTaxResidence": "DEU",
"industry": "Software & IT Services",
"employmentStatus": "Employee",
"sourceOfFunds": "Income from Employment",
"email": "hans.mueller@example.com",
"phoneNumber": "+4969123456789",
"politicallyExposedPerson": false,
"idvPerformed": false,
"initialKycCompletionDate": {
"year": "2024",
"month": "01",
"day": "10"
},
"lastKycCompletionDate": {
"year": "2025",
"month": "03",
"day": "13"
},
"addressStreet1": "Mainzer Landstraße 50",
"addressCity": "Frankfurt am Main",
"addressPostalCode": "60325",
"debugStatus": "passed",
"debugFailureReason": ""
}'
```
**EU unregulated identity statuses**
1. `initiating` — BitGo confirms receipt of the end user's KYC information.
2. `input error` — Name or birthdate fields contain formatting issues. You must update the identity before it can proceed.
3. `in review` — BitGo reviews the KYC information.
4. `awaiting signature` — BitGo completes review and requires the end user to confirm verification with a signature.
5. `signature submitted` — The end user has signed; final processing is in progress.
6. `approved` or `declined` — Final outcome of the KYC review.
#### Step Result
You create an identity for KYC purposes and BitGo returns the `id` and `status` of the created identity. The status is `initiating` which confirms that BitGo has received the end user's KYC information and is reviewing it.
```json JSON
{
"id": "993ec85b-ad23-4259-bde5-703a071a0783",
"status": "initiating"
}
```
## 2. (Optional) Check KYC Status
Check the KYC status of your end user to determine next steps.
>Endpoint: [Get KYC Identity](/reference/entityvalidationidentityget)
```shell cURL
export ACCESS_TOKEN=""
export ORGANIZATION_ID=""
export ENTERPRISE_ID=""
export IDENTITY_ID=""
curl -X GET \
"https://app.bitgo-test.com/api/evs/v1/identity?organizationId=$ORGANIZATION_ID&enterpriseId=$ENTERPRISE_ID&identityId=$IDENTITY_ID" \
-H "Content-Type: application/json" \
-H "Authorization: Bearer $ACCESS_TOKEN"
```
```js JavaScript
import superagent from 'superagent';
const ACCESS_TOKEN = '';
const organizationId = '';
const enterpriseId = '';
const identityId = '';
const apiUrl = `https://app.bitgo-test.com/api/evs/v1/identity?organizationId=${organizationId}&enterpriseId=${enterpriseId}&identityId=${identityId}`;
const response = await superagent
.get(apiUrl)
.set('Authorization', `Bearer ${ACCESS_TOKEN}`);
```
> 📘 **Note**
>
> You can create an organization webhook with the `identityStatus` type to receive automatic notifications when a user's identity status changes. For details, see [Create Webhooks](/docs/crypto-as-a-service-webhooks).
#### Step Result
BitGo returns one of the following KYC statuses:
* `initiating` - BitGo confirms receipt of the end user's KYC information.
* `input error` - The name or birthdate fields contain formatting issues. You must update the identity with properly formatted input fields.
* `in review` - BitGo reviews the KYC information.
* `awaiting signature` - BitGo completes review of the KYC information and now requires you to confirm verification with a signature.
* `approved` - BitGo approves your end user's KYC verification and marks it as complete.
* `declined` - BitGo declines your end user's KYC verification.
```json JSON
{
"identities": [
{
"id": "5436ff2e-1129-49f1-8334-1510955ffe00",
"status": "in review",
"organizationId": "68928b9066417fe09212fe9965c88552",
"enterpriseId": "690a234346b3252214cdaf72070c549e",
"userId": "690a234046b3252214cdadfe8600df80",
"createdAt": "2025-11-04T16:05:15.359Z",
"updatedAt": "2025-11-04T16:05:17.975Z",
"signaturesSubmitted": [],
"signaturesRequired": []
}
]
}
```
## 3. Sign Completed KYC
Once BitGo approves the KYC verification, your end user must sign to confirm. You can repeat [Step 2](/docs/crypto-as-a-service-know-your-customer#2-check-kyc-status), Check KYC Status, to verify when the end user is `awaiting signature`.
Your organization's agreements with BitGo determine the required `contractType` values. If you're unsure which contract types apply to your integration, contact your customer service manager (CSM) or support@bitgo.com.
Each signature object serves as a digital record of the end user's agreement. The `contractSignerNameFull`, `contractSignedDate`, and `contractSignedIPAddress` fields together capture the full name, timestamp, and IP address that constitute the electronic signature.
>Endpoint: [Submit KYC Signatures](/reference/entityvalidationidentitysignatures)
```shell cURL
export IDENTITY_ID=""
export ACCESS_TOKEN=""
curl -X POST \
"https://app.bitgo-test.com/api/evs/v1/identity/$IDENTITY_ID/signatures" \
-H "Content-Type: application/json" \
-H "Authorization: Bearer $ACCESS_TOKEN" \
-d '[
{
"contractSignerNameFull": "Hans Müller",
"contractSignedDate": "2025-03-13 13:14:09.767480+00:00",
"contractSignedIPAddress": "123.123.123.123",
"contractVersion": "1.0",
"contractType": "",
"userAgreesToTerms": true
}
]'
```
#### Step Result
```json JSON
{
"id": "cf5d766d-bef1-4874-8b02-54ded0e8333e",
"status": "signature submitted",
"organizationId": "6573806ef79cafdd1aff42fbffc2ab20",
"enterpriseId": "67d28e40ea178ede86f296ac90032286",
"userId": "67d28e3dea178ede86f2962e959865a0",
"updatedAt": "2025-03-13T07:59:52.564Z",
"createdAt": "2025-03-13T07:54:18.842Z",
"errorDescription": "",
"signaturesSubmitted": ["", ""],
"signaturesRequired": []
}
```
## 4. Initiate IDV
After you create the identity, start the IDV process for your end user by redirecting them to the BitGo-hosted verification link.
You can call this endpoint at any point after creating your user's identity. If the user already has an IDV record, this endpoint returns a fresh link without creating a duplicate.
> Endpoint: [Initiate Sumsub IDV for a user](/reference/sumsubpostv1idv)
| Field | Type | Required | Description |
|-------|------|----------|-------------|
| `userId` | string | Yes | The BitGo user ID of the end user |
| `enterpriseId` | string | Yes | The BitGo child enterprise ID |
| `verificationType` | `penny-drop` or `video-id` | Yes | The verification flow to use |
| `sumsubShareToken` | string | No | Share token to copy an existing Sumsub applicant from your own Sumsub environment |
| `lang` | string | No | ISO 639-1 language code for the WebSDK UI (e.g. `"de"`, `"fr"`). Defaults to `"en"`. |
| `includeSdkToken` | boolean | No | When `true`, returns a Sumsub Mobile SDK token alongside the WebSDK URL. Only valid for `verificationType: "video-id"`. |
---
```shell cURL
export ACCESS_TOKEN=""
curl -X POST \
https://app.bitgo.com/api/sumsub-service/v1/idv \
-H "Content-Type: application/json" \
-H "Authorization: Bearer $ACCESS_TOKEN" \
-d '{
"userId": "",
"enterpriseId": "",
"verificationType": ""
}'
```
```shell cURL
# To reuse an existing Sumsub verification, first generate a share token from your
# Sumsub dashboard with `forClientId` set to `bitgo.com_146799`.
# See: https://docs.sumsub.com/reference/generate-share-token
# Then pass that share token in the `sumsubShareToken` field below so BitGo
# copies the existing applicant from your other Sumsub environment.
#
# In production, add BitGo as a sharing partner in your Sumsub dashboard.
# Contact your CSM or support@bitgo.com to request the BitGo partner token.
# See: https://docs.sumsub.com/docs/manage-sharing-partners
export ACCESS_TOKEN=""
curl -X POST \
https://app.bitgo.com/api/sumsub-service/v1/idv \
-H "Content-Type: application/json" \
-H "Authorization: Bearer $ACCESS_TOKEN" \
-d '{
"userId": "",
"enterpriseId": "",
"verificationType": "",
"sumsubShareToken": ""
}'
```
#### Step Result
BitGo returns an `idvId` and one of the following statuses:
* `pending` — The end user must complete verification. BitGo returns a WebSDK `url` and an `expiresAt` timestamp. Redirect the end user to the URL to complete the flow.
* `action_required` — IDV attempt encountered an issue with one or more steps. The end user must retry the flagged steps to complete verification. BitGo returns a fresh `url` and `expiresAt`.
* `approved` — BitGo approves the end user's IDV. No further action required.
* `rejected` — BitGo rejects the end user's IDV permanently.
When the status is `pending` or `action_required`, redirect the end user to the returned `url`, where they complete the steps for their verification type:
1. **Liveness Check**
* Identity document — User uploads a government-issued ID.
* Selfie — User completes a biometric scan to confirm their ID.
2. **Penny Test** — User initiates a small bank transaction to confirm their name matches their bank account. Allow up to 72 hours for this step to complete.
> 📘 **Note**
>
> In the test environment, BitGo skips the penny test step and completes verification without a real bank transaction.
1. **Identity Document** — User uploads a government-issued ID.
2. **Applicant Data** — User provides required personal information.
3. **Video Call** — User completes a live video session with a BitGo agent, including a selfie and phone verification.
> 📘 **Note**
>
> Video ID verification must be enabled for your organization before use. Contact your customer service manager (CSM) or support@bitgo.com to request access.
>
> In the test environment, BitGo skips the video call step and completes verification without a real video session.
BitGo receives the result automatically after the end user passes all steps. You don't need to take any further action.
Verification links expire after the time indicated in `expiresAt`. If a link expires before your end user completes verification, call this endpoint again with the same parameters to get a fresh link. BitGo reuses the existing verification record and doesn't create a duplicate.
```json JSON
{
"idvId": "a1b2c3d4-e5f6-7890-abcd-ef1234567890",
"status": "pending",
"url": "https://verify.example.com/p/abc123...",
"expiresAt": "2026-05-01T12:00:00Z"
}
```
## 5. (Optional) Check IDV Status
Poll this endpoint to check the current IDV status for an end user. This endpoint doesn't refresh the WebSDK URL — call the Initiate IDV endpoint in step 4 to retry or generate a new link.
> Endpoint: [Get Sumsub IDV status](/reference/sumsubgetv1idvid)
```shell cURL
export ACCESS_TOKEN=""
export IDV_ID=""
curl -X GET \
"https://app.bitgo.com/api/sumsub-service/v1/idv/$IDV_ID" \
-H "Authorization: Bearer $ACCESS_TOKEN"
```
> 📘 **Note**
>
> You can create an organization webhook with the `idvStatus` type to receive automatic notifications when a user's IDV status changes. For details, see [Create Webhooks](/docs/crypto-as-a-service-webhooks).
#### Step Result
BitGo returns the current status of the IDV record. The `status` field uses the same values as step 4 (`pending`, `action_required`, `approved`, `rejected`). When BitGo rejects an IDV, the `rejectLabels` array lists the reasons.
```json JSON
{
"idvId": "98f20884-f3ce-4949-a969-4a6010ae00e1",
"status": "approved",
"verificationType": "penny-drop",
"userId": "69fce210ac533caa20ef5bdcfc2ef3d4",
"enterpriseId": "69fce212ac533caa20ef5c13ff183e84",
"organizationId": "69e291d44afc2b668a3ac76d16fef106",
"rejectLabels": null
}
```
## 6. (Optional) Switch Verification Type
If an end user's IDV is in `pending` or `action_required` state, you can switch them from one verification type to another (for example, `penny-drop` to `video-id`). Returns a fresh WebSDK link for the new flow.
> 📘 **Note**
>
> Not available for share token (copy applicant) flows, or for IDVs that are already `approved` or permanently `rejected`. `video-id` must be enabled for your organization. Contact your CSM or support@bitgo.com to enable `video-id`.
> Endpoint: `POST /api/sumsub-service/v1/idv/:idvId/change-verification-type`
| Field | Type | Required | Description |
|-------|------|----------|-------------|
| `verificationType` | `penny-drop` or `video-id` | Yes | The verification flow to switch to. |
| `includeSdkToken` | boolean | No | When `true`, returns a Sumsub Mobile SDK token. Only valid for `video-id`. |
---
```shell cURL
export ACCESS_TOKEN=""
export IDV_ID=""
curl -X POST \
"https://app.bitgo.com/api/sumsub-service/v1/idv/$IDV_ID/change-verification-type" \
-H "Content-Type: application/json" \
-H "Authorization: Bearer $ACCESS_TOKEN" \
-d '{
"verificationType": "video-id"
}'
```
#### Step Result
```json JSON
{
"url": "https://verify.example.com/p/xyz789...",
"expiresAt": "2026-05-01T12:00:00Z"
}
```
## Next Steps
[Create Go Accounts](/docs/crypto-as-a-service-go-accounts) for your users.
## See Also
* [API Reference: Create KYC Identity](/reference/entityvalidationidentitycreate)
* [API Reference: Get KYC Identity](/reference/entityvalidationidentityget)
* [API Reference: Update KYC Identity](/reference/entityvalidationidentityupdate)
* [API Reference: Add KYC Documents](/reference/entityvalidationidentitydocumentcreate)
* [API Reference: Get KYC Document](/reference/entityvalidationidentitydocumentget)
* [API Reference: Update KYC Document](/reference/entityvalidationidentitydocumentupdate)
* [API Reference: Submit KYC Signatures](/reference/entityvalidationidentitysignatures)